


Tuesday, 30 November 2010


Edmonton's always been a cold city, with snow starting in October this year. Of course little girls love snow, while their mommies think its cold, wet and miserable, but little girls win these rounds with their mommies. Mommies then bundle up as warmly as they can and head outside to build snowmen, get snowballs thrown at them, and make snow angels (which leads to really cold backsides)... and the end result is a tired, but happy little girl and a cold mommy, both who decide that a cup of hot chocolate is the best thing in the world, ever :-)
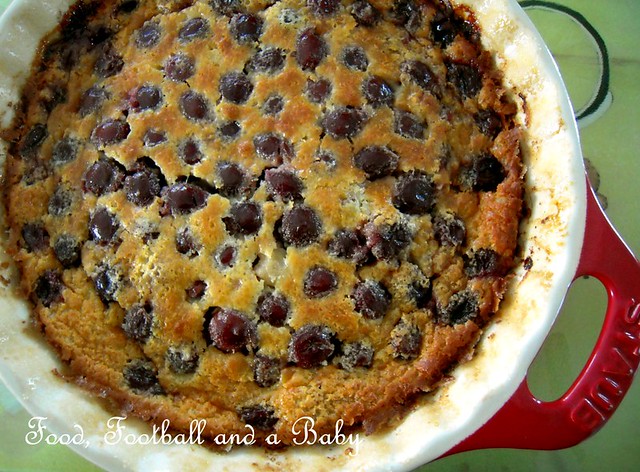
This chocolate pudding fulfills that basic need of mommies and little girls. When I heard that Julia at A Slice of Cherry Pie was hosting a Snow Day Bake Off, my ears almost fell off with excitement (or was that with the cold?) I don't normally take part in bake offs and such like, as I ocasionally still feel a bit insecure about my baking, not being someone who grew up with a baking tradition.
However, I had a recipe for chocolate pudding from BBCs Good Food magazine that I wanted to try for a long time. Julia's bake off gave me a good excuse to indulge myself and the family, with this rich moist half pudding, half cake, with dark chocolatey sauce melting through it and the tangy, juicy sweetness of Bing cherries scattered through. The original recipe is for a self saucing chocolate orange pudding, but I adapted it heavily. I did have orange chocolate and fresh oranges but a certain big, blond greedy person ate the chocolate and the oranges that I was saving for this pudding. So it got changed to chocolate cherry instead, what with chocolates, cherries and rum being very good friends indeed (wink!)
This household also has a bottle of dark rum in an emergency cupboard (which gets raided too often to be an emergency cupboard, really), so a glug of rum got added to the pudding too (most of the alcohol got boiled off, of course, I am not a completely irresponsible parent :-)). I also remeasured everything into volume (cup) measures, as I tend to use those more often than weighing out the ingredients.
The pudding came out delicious with streaks of intense chocolatey sauce running through it and the bursts of cherry juice. I made it in individual ramekins, so the sauce wasn't as plentiful as I would have liked, and I think I will make it in a baking dish next time. But other than that, it was absolutely gorgeous and decadent! Its also very chocolatey, so if you want it a bit sweeter, I suggest using milk chocolate instead of dark. It disappeared quickly, so no bets on how much this family liked it!
Recipe:
(Printable Recipe)
1/4 cup unsalted butter (roughly around 55 g)
3/4 cup plain flour
1/2 cup caster sugar
4 tbsps cocoa powder
3/4 tsp baking powder
Pinch of salt
2 eggs
75 ml milk
50 g dark chocolate, chopped
1 and half cup cherries, fresh or frozen
2 tbsp sugar
1 tbsp dark rum
1/2 cup brown sugar
150 ml boiling water
1 and half tbsp cocoa
Method:
Put the cherries, 2 tbsp sugar and rum into a pan, and gently heat until the cherries release their juice, about 5 - 7 minutes. Let cool.
Sift together the flour, salt, caster sugar, baking powder and cocoa. Gently melt the butter, and in a bowl, whisk together the eggs, butter and milk. Stir in the cooled cherries and their juices. Fold into the flour mix, beating well with a spatula until the pudding mixture is well blended. Stir in the chopped dark chocolate.
Carefully spoon the batter into 4 buttered 7 oz ramekins.
In a bowl, whisk 150 ml boiling water with the brown sugar and 1 and half tbsp cocoa. It should measure up to 200 ml, once blended together. Now divide this into four 50 ml portions and pour over the batter in the ramekins.
Carefully place the ramekins in a baking tray, then in an oven preheated to 175 C or 350 F. The baking tray helps to catch any spills. Bake for 25 - 30 minutes without opening the oven door. The tops of the puddings should be well risen by this time.
Take out the puddings, let cool for a few minutes, and serve warm with icecream or whipped cream.
Thursday, 25 November 2010

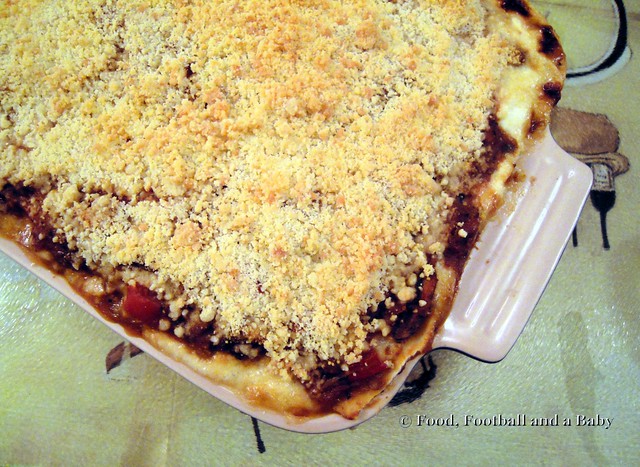
What do you get when you are in a mood for a custard, but also a cake? Why, a clafoutis of course!! This divine dessert is a delight, delicious, decadent and droolworthy. And quite simply a cinch to make if you're up to an afternoon of baking, but its not quite time to break out the Christmas recipes.
Thanks to a few bucketfuls of fresh Bing cherries from our friend in Terrace, I have a freezer full of cherries that are just waiting to be made into desserts through the long cold winter. Truly a taste of summer, these cherries remind me of this summer's drive back from Terrace to Edmonton. We had a bucket of cherries between the drivers and passenger seats, and our lips were stained black from snacking on them all the time. Ocasionally we'd toss a couple into the back seat where there was an eager kid just waiting to chow down on them. Ah, memories.

Fresh cherries are not something I grew up with and the cherries we got back in India were either the small, sour varieties or came in a bottle with enough sugar syrup to kill all of their character. Of course, this meant that when I did finally taste fresh cherries off the tree, I was a kid in a candy store... Aditi, Kay and I spent more time at that tree in Terrace than with the in-laws :-)
My favourite recipe for cherry clafoutis is one from Raymond Blanc, God of all French Cooking (and Gallic good looks, of course!) This particular version has been adapted a bit, because I did not have some ingredients, plus I wanted to make it a little lighter. The original version is here, and also available in the BBC's Foolproof French Cookery, so feel free to try them out!
This tastes best warm, just taken out of the oven, and left to sit for a few minutes (if you have the patience), but I have had it the next day cold and with a scoop of homemade vanilla icecream and it's still pretty divine. Of course, it is even better with fresh cherries, but frozen work just as well.
Recipe:
(Printable Recipe)Cherries:
500g cherries, pitted, fresh or frozen (if using frozen, measure them out when they are still frozen)
A couple tbsp dark rum or kirsch
About 100g sugar
Clafoutis:
100g plain flour
5 tbsp sugar
A pinch of salt
3 eggs + 1 egg yolk
Zest of one small lemon
2 drops natural almond extract
150ml milk
150ml single cream or half and half
70 - 75g butter, melted to a light brown colour
Method:
Mix together the cherries, rum or kirsch and sugar in a bowl, and pop into the fridge for a couple hours. If using frozen cherries, leave out for the cherries to thaw. If they haven't thawed sufficiently in time to be added to the batter, defrost quickly in microwave.
Preheat the oven to 180 C or 350 F.
In a big bowl, whisk together the flour, salt, sugar and eggs and egg yolk. Add the lemon zest and almond extract and stir together. Now add the milk and cream and whisk until well blended.
The melted butter should still be hot at this point. Slowly drizzle it into the batter, whisking constantly until it is all incorporated.
Stir in the cherries and any remaining marinade into the batter.
Grease the baking tray or pie pan with a little butter, and sprinkle over some caster sugar.
Pour the batter into this prepared tray or pie pan, and bake for 35 - 40 minutes, resisting the urge to open the oven at this time. Keep an eye on the clafoutis, and when it looks like its browning on the top, gently open the oven, and skewer it. If the skewer comes out clean, the clafoutis is done. If not, let it bake for a few more minutes. Take it out of the oven, and let it rest for a few minutes.
Serve with ice cream or heavy cream.
Monday, 22 November 2010
Sometimes I even have to cater to the husband's request for comfort food ;-) Today was one of those days, and he loves lasagne so I decided to whip one up. It helped that it was -34 degrees outside and I wasn't about to leave the warmth og the kitchen! Lasagnes are fairly easy to make, and the nice thing is you can whizz around and clean the kitchen when they're baking, so you have a delicious dinner and a clean kitchen.
I normally make my own pasta for this recipe, but I was out of 00 flour, so ended up using a frozen batch of lasagne sheets from the Italian Centre. I love fresh pasta, and prefer it to dried, but you can use dried lasagne sheets as well. Just cook them to package instructions before layering. Or you can use precooked lasagne noodles that cook in the oven and do not need pre-boiling.
This lasagne is from a very basic recipe, adapted from the Best of Bridge. I make mine a vegetarian one, but you can just as easily make it with minced/ ground beef or lamb. All you have to do is brown the meat with the onions and garlic first. This sauce can also be used on top of other pasta, or even in a chili if you wish.
The finished dish freezes very well, uncooked. Just assemble, put in the fridge to go completely cold, then cover and freeze. To cook from frozen, first defrost a bit. Then pop the dish into an oven that has not been preheated, starting the cook time from when the oven preheats. This way the dish will be heated and cooked all the way through and you won't have a still frozen middle.
We had ours with broccoli, salad, a chunk of French bread and a glass of red wine! Yummy!
Recipe:
(Printable Recipe)
For the meat/ veggie sauce:
1 onion, diced
2 flakes of garlic, minced
Around 250 - 300g Yves vegetarian ground round, quorn mince, or ground (minced) beef
1 red pepper, diced
About 8 - 10 mushrooms, cleaned and sliced
1 tin of diced tomatoes (roughly 400g)
500 ml tomato passata (or tomato pasta sauce)
3 - 4 tbsp tomato paste
2 tsp dried basil (or 2 tbsp finely chopped fresh basil)
2 tsp dried oregano (or 2 tbsp fresh chopped)
1 tsp garlic powder (optional)
3 tbsp Worcester sauce
100ml red wine (optional)
Around 1 tbsp olive oil
Salt and pepper to taste
You may need: 2 tsp cornflour, mixed in with a little water.
For the lasagne:
Depending on the size of your baking pan, 8 - 10 lasagne sheets, trimmed (cooked acording to package directions, if needed)
300g mozarella cheese, sliced
500g ricotta or cottage cheese, beaten to a creamy consistency
Handful chopped fresh chives (optional)
About 250g grated parmesan cheese
Method:
Heat the olive oil in a pan, and brown the onion, garlic and veggie or meat mince for roughly 5 - 6 minutes (or until the meat is cooked) . Add the mushrooms and red pepper and fry for around 3 minutes more.
Add the red wine (if using), Worcester sauce, all the tomato bits and bobs, the basil, oregano and garlic powder (if using). Stir together well, and season with the salt and pepper to your taste. Simmer for roughly 30 minutes to an hour. Taste and adjust the seasoning.
If the sauce is too watery, add the cornflour mixture and stir until the sauce thickens.
Preheat the oven to 175 C (350 F).
Assemble the lasagne. First, layer the tomato/ meat/ veggie sauce in a deep baking dish. Top with a layer of pasta. Then gently layer the creamy ricotta on top of it. Sprinkle over a handful of snipped chives. Then put half the sliced mozarella cheese. Sauce, pasta, ricotta, chives, mozarella again. Repeat the layers until everything is used up. For the final two layers, use the pasta sheets, then the tomato sauce. Sprinkle over the parmesan cheese.
Bake in the oven for 30 - 40 minutes, until the pasta is cooked, and you can just see the sauce bubbling underneath.
Take out from the oven, and let the lasagne rest for about 30 minutes. This will help firm up the layers, so when you cut into it you get nice neat layers instead of a gooey mess (which is pretty good too!!).
Serve with a salad, veggies and bread. Goes very well with a lovely red wine :-)
Thursday, 18 November 2010
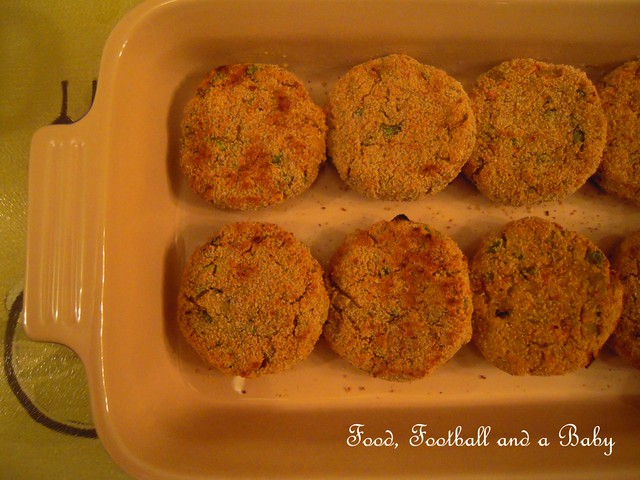
With temperatures hitting -20 here in Edmonton, I figure its absolutely fine if I gorge on comfort foods. After all I have to keep up my core body temperature... at least, that's my excuse :-)
Vegetable cutlets are another of my comfort foods. They are an ubiquitous snack in India, especially on trains. Having spent loads of time on trains travelling to and from home and university, I am especially nostalgic about train food. They are usually served simply with a bit of chutney and ketchup, and are filling, fairly nutritious and delicious, with their crisp fried outsides and yummy moist, spicy, vegetabley insides!
I made these cutlets to serve as a snack with afternoon tea, and they went down extremely well with the family. You can pretty much use any mashable vegetables in these cutlets along with the potatoes. I used carrots, peas, cooked chickpeas and sweet potatoes . Skip the green chillies for a less spicy version. They also work really well as an alternative to meat burgers.
The cutlets freeze very well, fried or not. If you want to freeze them uncooked, just layer them between squares of greaseproof paper, defrost thoroughly before frying. If you're freezing fried cutlets, defrost before using, and use a oven to reheat them to regain their crisp outside.
Recipe:
(Printable Recipe)
1 small onion, chopped fine
1 large or 2 small carrots, diced
1 large potato, diced
1 medium sweet potato, diced
1/2 cup fresh or frozen green peas
1/2 cup tinned, or cooked, chickpeas
2 flakes garlic, microplaned or grated into a paste
1 inch piece of ginger, microplaned or grated into a paste
1 or 2 green chillies, chopped fine
2 tsp ground coriander
1 tsp tbsp ground cumin
1 tsp garam masala
1/4 tsp chilli powder (increase for added spiciness)
1/2 tsp amchur (dried mango powder) (optional)
2 - 3 tbsp finely chopped fresh coriander
A few tbsps besan or gramflour (or cornflour)
Salt and pepper to taste
1 cup dried breadcrumbs or a coarse semolina (sooji), for coating
Oil, enough for shallow frying
Method:
Boil the carrots, potatoes, sweet potatoes and peas, until cooked and tender.
In a small frying pan, fry the onion for around 2 -3 minutes. Add the ginger and garlic, fry for a minute, then add the green chilly(ies). Fry for around 30 seconds, then add the ground coriander, cumin, chilli powder, amchur and garam masala. Fry together for another 2 or 3 minutes, adding a dash of water if the mixture is too dry.
In a large bowl, mash the boiled vegetables, along with the chickpeas. Tip in the fried onion/ spice mixture and mash again. Add the fresh coriander and mix in well. If this mixture is too wet, stir in a couple tbsps of besan or cornflour, until it binds together well. Season with the salt and pepper to your taste.
Shape the mixture into balls, then flatten until you have round cutlets. You can also shape them into other shapes like hearts, triangles, squares etc, according to your preference.
Gently dredge the shaped cutlets in the breadcrumbs or semolina, coating well. Put the prepared cutlets into the fridge for about 30 minutes or so. This will help them set, and not break up in the pan while cooking.
In a frying pan, add just enough oil for shallow frying. Fry the cutlets, two or three at a time, until both sides are golden brown.
Serve with coconut or mint chutney and ketchup and a hot cup of tea or coffee. Yummy!!
Sunday, 14 November 2010
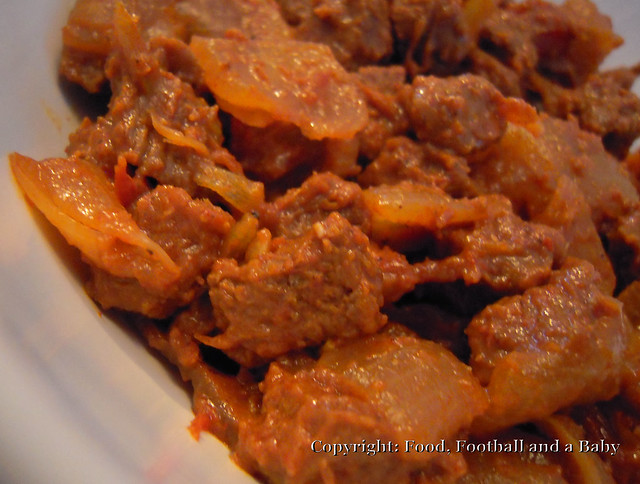
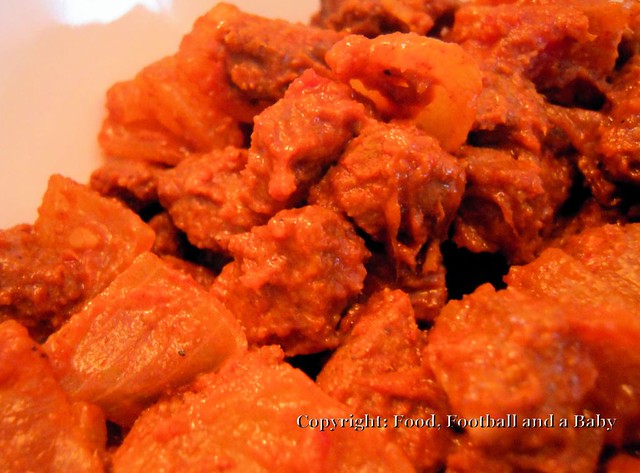
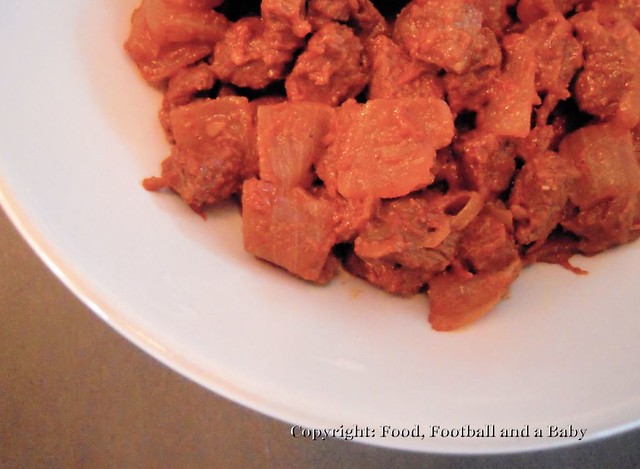
The Costa Hotel is a Mangalorean institution and serves probably the best Mangalorean food I've eaten. Any Mangalorean will recognise this name, and will probably have eaten there at some point! They have many specialities, but for me their standout dish is their beef chilly fry, which is unlike anything else I have tasted. Spicy enough to make the most seasoned spice eaters' eyes water, but at the same time, so moreish that you cannot stop eating it. Its a vibrant red colour, probably due to the liberal use of hot chilli powder, and something that I miss so much when I am away from home.
A group of us always used to rush to Costa's to eat our lunch when we were at college, almost always ending up going back late for classes, and getting told off by our lecturers. Ah, happy days! Even now, my first request on going back home is for my dad to go out and get me a plateful of beef chilly fry and malabar parathas from Costa's that I will then devour greedily.
Now you may have noticed that I do not tend to post very many meat recipes on here. That's because both my husband and daughter are pescitarian and don't eat meat. So when I do cook meat, I almost always cook things that I remember from my childhood, that remind me of home and traditional Mangalorean recipes. This one is one of my absolute favourites! I still haven't managed to replicate the exact Costa taste (and I probably never will), but I believe this recipe comes pretty close.
I suggest that if you are Mangalorean, you may want to increase the quantity red chillies in this recipe, as it will add that super spicy flavour that you may remember from Costa's. Me, I have lived too long in the West, and my tastebuds have gone a bit wonky, I now prefer a subtle flavour instead of heavy spicing. Either way, here's the recipe, and do let me know if you like it.
This dish tastes much better after it has sat in the fridge for a day, so if you can, pop the finished dish into the fridge, reheat and serve the next day for the best taste. It tastes awesome with just about any bread, my favourite is with sannas.
Recipe:
(Printable Recipe)
½ kilo beef, cut into small cubes (I use top cut sirloin, as you don't have to cook it for very long, but you can use braising or stewing beef)
1 big onion, diced large
1 big, or 2 small tomatoes, diced large
2 flakes of garlic, sliced
1 - 2 hot green chillies, sliced lengthways (optional)
1 tbsp soya sauce
1 tbsp hot chilli sauce
1 tsp Tabasco sauce (optional)
Salt to taste
Around 2 tbsp oil
For the masala:
4 - 5 long mild red chillis (use more or less according to your spice tolerance, I would suggest about 3 or 4 more for Mangaloreans)
¾ tsp cumin seeds, jeera
5 - 6 whole peppercorns
1 inch piece of cinnamon or cassia bark
4 whole cloves
1 inch piece of ginger, chopped
4 flakes of garlic, chopped
1 tbsp paprika (optional)
½ medium onion, chopped
Method:
For the masala marinade:
Toss together the red chillies, cumin seeds, peppercorns, cinnamon and cloves in a hot, heavy pan, until the spices are just toasted. Transfer to a heavy duty blender or mixie. In the same pan, add the chopped onion, garlic and ginger and fry without oil till the raw smell from the onion disappears, around 5 - 6 minutes. Transfer to the blender with the spices, and grind to a fine paste, using a little water if necessary. You should get quite a nice red paste. If your paste is not red enough, use a tablespoon of paprika, it will give the masala a lovely red colour without adding too much spiciness.
Add salt to taste. I normally use around 1 and half teaspoon.
Marinate the cubed beef in this masala for at least 1 hour, more if possible.
In a pan, heat the oil, then add the diced onion. Fry for about 5 minutes on a medium heat, stirring. Add the sliced garlic and green chillies (if using) and fry for a minute more. Now add the tomatoes, and cook for roughly 5 minutes, until the tomatoes are soft and squishy.
Add the marinated meat along with any marinade, to the pan, and fry on a high heat, stirring constantly until the beef is cooked and the masala is quite dry. Cooking time will depend on the tenderness of the beef. For me it takes around 10 - 12 minutes. Stir in the soya and chilli sauce and tabasco and cook for a few more minutes.
Taste and adjust the salt. You can make this dish with a little gravy if you want, just add a dash of water as the beef cooks.
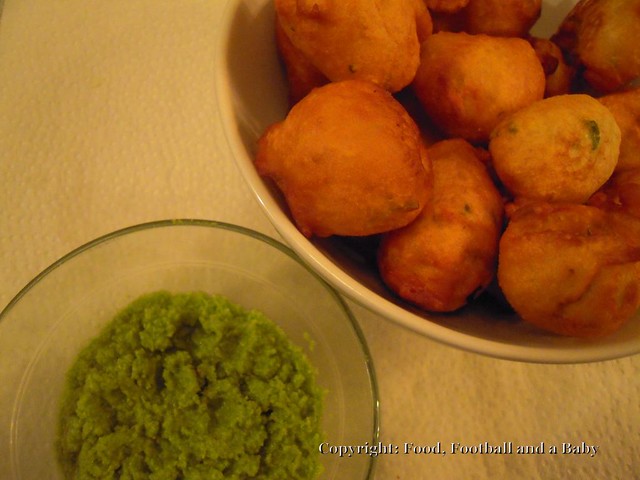
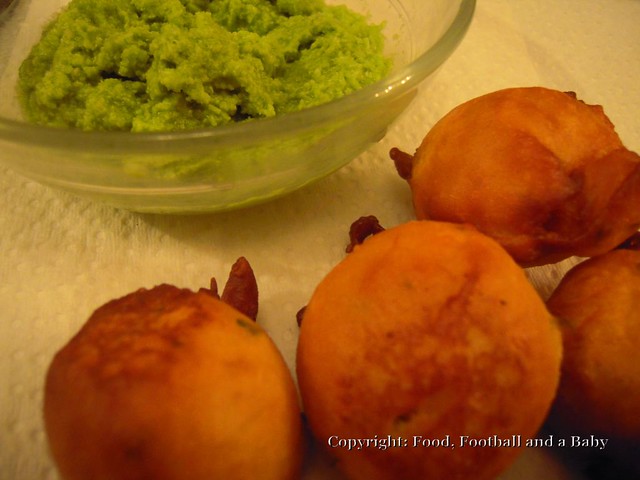
Friday, 12 November 2010

Yum yum yum!! Another snack I adore from Mangalore. I can eat goli baje by the bucketful if given the opportunity. Goli baje are basically deep fried seasoned balls of flour and yoghurt, lightly spiced with some green chilli, ginger, fresh coriander and even curry leaves. The literal translation of the words means, 'round fried snack'. Its famous all around Mangalore, and many a time I have sat in a hotel in the middle of nowhere, sipping strong hot coffee and savouring these mini bites of delight with sambar and coconut chutney, sometimes even with good old ketchup.
It is another one of those snacks that is deeply associated with my memories of Mangalore, and home. There were days when my mum would come home from her teaching job absolutely exhausted, and she couldn't be bothered to make us anything for tea. My sister and I used to be sent to Gokul Vegetarian Hotel to buy snacks, and ten to one, we would end up bringing back home goli baje which we would then share with mum and a hot cup of tea. Or when we got older, we would spend hours with friends at roadside eateries just eating snacks after snacks after snacks. Its a miracle I haven't ended up weighing ten tonnes, the way we ingested all that cholestrol heavy food :-)
This is one of those snacks we never really bothered to make at home. I mean, why would we go to the trouble of making up the batter and spending at least an hour over a hot stove when we could just pop around to the local eatery?
However, when I moved to England, and subsequently, here to Edmonton, there are times when I crave the comforting food of my childhood and most of my adolescence. Sadly for me, I haven't found a single place in Edmonton that sells goli baje (I am sure I would keel over with a heart attack if I did, I'd be eating there so often). I have found a nice South Indian place though, more on that in a later post. So coming back to my point, if I want goli baje I have to make them myself. Bah humbug, all that work!!
So anyway, armed with a list of ingredients off my mum (I swear to God, she is so imprecise in her measurements, a bit of this and a bit of that, and yet her food somehow tastes glorious!!) I decided this afternoon was going to be my goli baje time. It gets dark early nowadays, and its so cold outside, it would be just criminal not to gorge full of comfort food! Or at least, that's my excuse.
The ingredients are fairly basic, more often that not you will have them in your pantry at any given point. You do need to get a feel for the thickness of the batter though, but that comes very quickly with some practice. And hey, you can always add more water or flour without messing with the taste.
I tinkered a bit with mum's recipe, to make sure I had some basic ideas of quantities, as normally with a recipe like this I would have eyeballed it. So here's the modified recipe. Do play around with the quantity of green chilli and ginger until you get a sense of what suits your spice tolerance level. My mum suggests letting the batter ferment for at least 6 hours, I say ha!! to that, but good on you if you have the patience to do that, 30 minutes is my limit :-)
I served the goli baje with coconut chutney, recipe here.
Recipe:
(Printable Recipe)
1 cup plain flour (maida)
1/4 cup besan (chickpea/gram flour)
1/2 cup plain yoghurt
1 tsp bicarb of soda (substitute baking powder, if you don't have the bicarb)
Around 1/4 cup water, plus maybe a little bit more.
2 tbsp sugar
1 or 2 tsp salt (go easy on the salt, add more only if you feel the batter needs it)
Around 2 tsp finely chopped ginger
1 green chilly, finely chopped (add more if you wish to increase the spice level)
Roughly 3 tbsp finely chopped fresh coriander
Enough oil for deep frying
Method:
Sift together the flour, besan, bicarb of soda, sugar and salt. Mix well, then add the yoghurt, mixing well. Now slowly whisk in the water, a little at a time until the batter just very heavily slides off a spoon, the consistency of very thick clotted cream...
Heat enough oil for deep frying in a pan, until it gets hot enough that if you drip in a drop of batter, its should quickly rise to the surface covered in bubbles. Turn the heat down to medium.
Drop in spoonfuls of the batter, not too much at a time, as the bajes will fluff up in the oil. Deep fry for roughly five to seven minutes, until they are a light golden brown colour. Don't worry if they are odd shapes and sizes, just adds to the fun!
Using a slotted spoon, lift them gently from the oil and drain on absorbent kitchen paper. Repeat until the batter is all used up.
Serve hot with chutney or ketchup and a hot coffee/tea. The bajes will be crisp on the outside and almost squishy elastic on the inside!
Bliss!!!

Wednesday, 10 November 2010
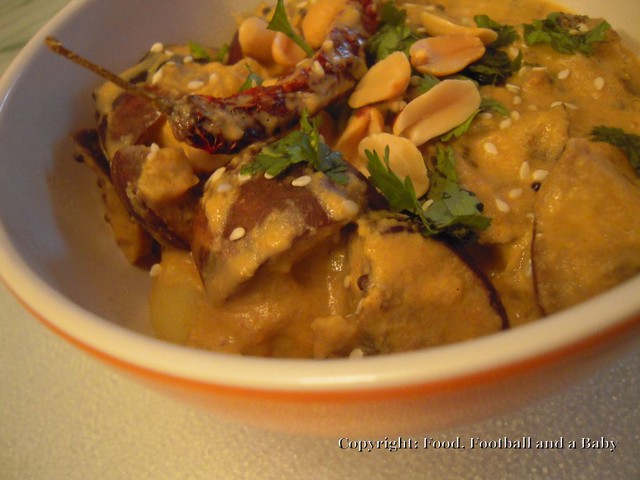
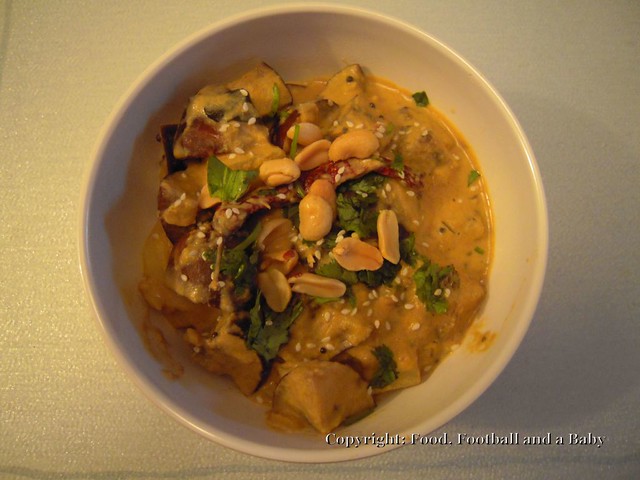
The inspiration for this dish is the fantastically flavoured Bagara Baingan, a staple of Hyderabadi cuisine. There aren't a huge number of Indian dishes that use peanut sauce as a base, but this is one of them. Along with sesame seeds (til), this dish is just an amazing combination of sweet, salty, tangy and nutty, with a mild flavour of spice coming through. Putting it simply, a healthy, delicious and perfect vegetarian/ vegan dish for a family weekday supper.
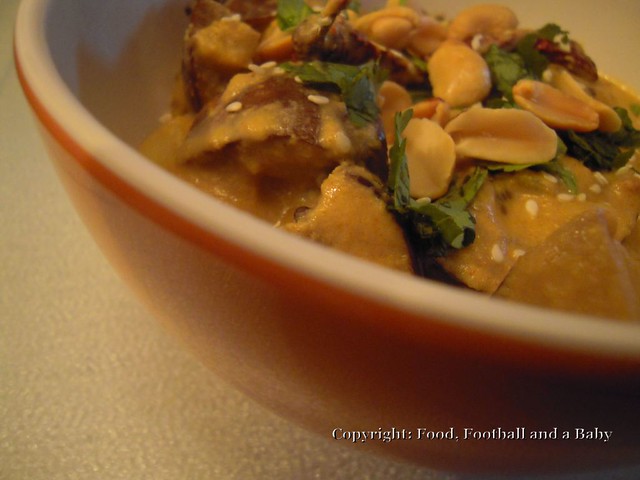
You can make this recipe with aubergine and potato, like I have, or with any other vegetables that need using up. I have also played around a bit with the spicing and the garnishings, but the key elements in this sauce are sesame seeds and peanuts. The sauce alone is beautifully subtle and would also be perfect with paneer.
This dish is the perfect make-ahead dish, as the flavours really develop and come together if you serve it the day after it's cooked. Just reheat gently, tossing in the garnishings at the end.
Recipe:
For the masala:
1 tbsp coriander seeds
1/2 tbsp cumin seeds
2 - 3 mild long red chillies (add more for increased heat) +
1/2 tsp ground turmeric
2 and half tbsp unsalted peanuts
1 and half tbsp white sesame seeds
1 /2 a large onion, chopped roughly
3 flakes garlic, chopped roughly
1 inch piece of ginger, chopped roughly
The rest of the recipe:
1/2 large onion, diced fine
2 medium potatoes, cubed
4 small baby aubergines, cubed
2 tsp tamarind paste (or a walnut sized ball of tamarind, soaked in water and the pulp strained out)
1 tbsp lemon juice
Around 3 tbsp oil for frying various bits and bobs
Salt and pepper to taste
Seasoning:
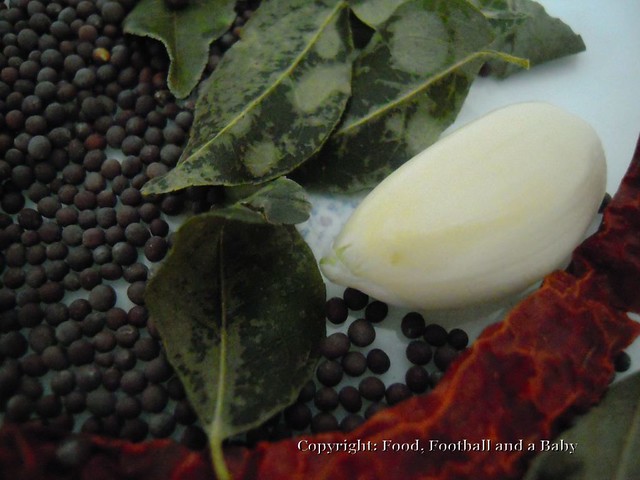
1 tsp black mustard seeds
1 sprig curry leaves
1 flake garlic, smashed
1 long mild red chilly
Garnish:
1 tsp toasted sesame seeds
Small handful toasted peanuts
Big handful fresh coriander, chopped
In a hot heavy pan, toss together the coriander seeds, cumin seeds, red chillies, peanuts and sesame seeds for around 2 minutes, stirring constantly until the spices start to smell fragrant. Transfer to a powerful blender. In the same pan, throw in the 1/2 chopped onion, ginger and garlic, and cook for around 2 minutes or so without oil, until the raw smell of the onion disappears. Transfer to the same blender as the spices.
Using around 1/2 cup of water, grind the above ingredients to a smooth paste. Clean the blender/ mixie with around 1/2 cup water, and keep this water aside.
In a saute pan, add 1 tbsp oil, and cook the remaining 1/2 diced onion for 3 to 4 minutes, until light brown. Add the masala from the blender and fry for about 4 minutes or so, until the masala starts coming together into a sticky mass. Now add the cleaning water, tamarind and lemon juice. Stir it all in, then season to taste.
If the sauce is too thick, thin it with a little hot water.
Meanwhile, fry the cubed aubergines in a little oil, until cooked and tender. Alternatively, you could roast it in an oven for about 30 minutes till they're cooked. Boil the cubed potatoes till tender and keep aside.
When you have the sauce at the consistency of double cream, stir in the aubergine and potatoes and cook on a low heat for another 10 - 15 minutes to let the flavour of the sauce infuse into the vegetables.
To make the tempering, heat another tbsp oil in a small pan, and when the oil is hot add the mustard seeds, curry leaves, garlic and red chilly, frying for about 30 seconds until the seeds start spluttering. Pour the seasoning into the curry and stir.
Garnish with the fresh coriander and toasted sesame and peanuts.
Tuesday, 2 November 2010
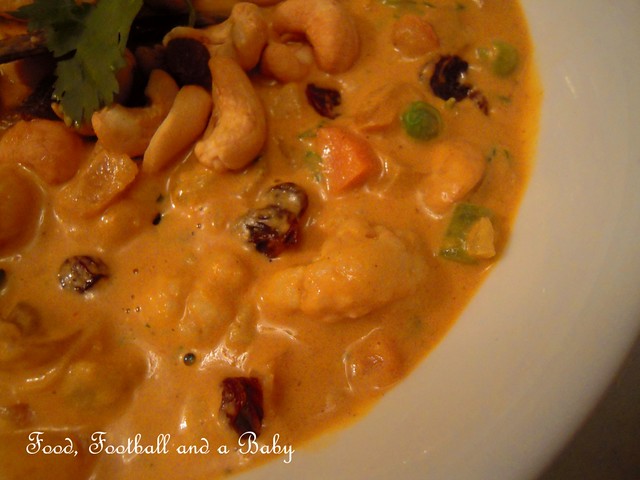
'Navratan' literally means 'nine jewels'. This korma is made with a combination of nine vegetables, fruits, nuts and paneer, giving it its distinctive sweet/ spicy taste and its unique name. I made this gorgeous dish as a nod to the festival of lights, 'Diwali', which is celebrated this year on the 5th of November. I am not Hindu, but its hard not to get caught up in all the excitement when Diwali happens, from lighting up homes with little clay 'diyas' to bursting firecrackers, and stuffing ourselves with sweets till we're sick. I particularly enjoyed Diwali when I was at university, and spent lots of time wandering the lit up streets of Delhi, soaking in the unique experience that makes up religious festivals in India.
I first tasted Navratan Korma in Delhi, at the birthday party of a close friend Shreeniwas. Shree is a pure vegetarian, and his birthday used to be one of the few times a birthday was celebrated in our group with no meat dishes. We always ended up in the same place to celebrate birthday treats, a tiny restaurant called 'Mezbaan', near IIT Delhi, and I have very nostalgic memories of that place. A taste of this korma takes me back to those wonderful, carefree and heady university days, where we relished our first independent steps outside our homes. Isn't is amazing how many memories can be associated with just food?
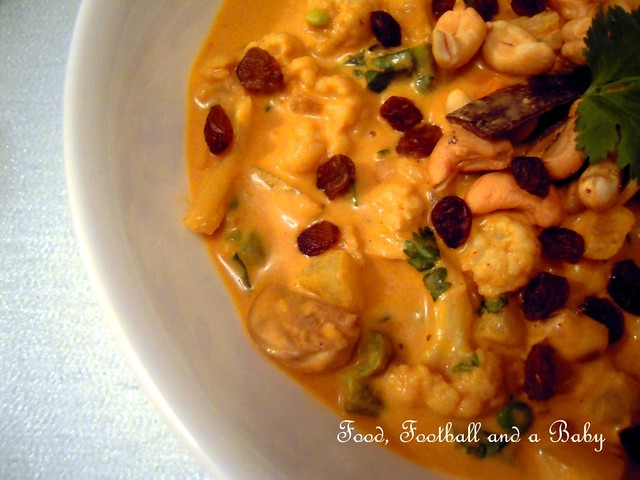
Most people will have their own recipe for this rich, creamy and delicious Mughlai classic. But this is a dish that lends itself well to several different vegetables and also fruits like pineapple, and nuts and raisins. I have even seen a recipe for it that includes black cherries. Yum!!
This recipe is mine and is adapted to suit our taste. For example, I only use a splash of cream for the garnish, and rely on cashew nut paste instead, to add a rich, creamy taste to the dish. I also vary the vegetables to suit whatever I have in my cupboard. The other great thing about Navratan Korma is its kid friendly assortment of vegetables, and it is very mild. Aditi wouldn't normally touch potatoes and mushrooms with a bargepole, but happily chowed down everything in this dish, probably enticed by the raisins, but I do not complain :-)
Here's my version, do feel free to play around with the combinations of vegetables, and don't forget to let me know how it all turns out!
A happy and prosperous Diwali to all my valued readers!!

Recipe:
(Printable Recipe)
1 and half cups vegetables, all diced (I used 100g beans, 1 carrot, handful of peas, 1 small potato, 6 white mushrooms and 1/4 of a cauliflower)
Around 150g paneer, cubed small
3 tinned pineapple rings, chopped into small chunks
2 large handfuls of cashewnuts
1 large handful raisins
1 medium onion, diced fine
4 flakes garlic, crushed to a fine pulp (or microplaned)
1 inch piece of ginger, grated
2 tbsp tomato puree
1 tbsp ground coriander
1/2 tbsp ground cumin
1/4 tsp hot chilli powder (increase for added heat)
1 tsp garam masala
1/4 tsp ground turmeric
1 inch stick of cinnamon
4 whole cloves
3 lightly crushed cardamoms
Around 2 tbsp oil
Around 150 ml milk
Salt
Sugar
Garnish:
Splash of cream
Handful chopped fresh coriander
Method:
Measure up to 100 ml of cashewnuts into a measuring cup. Add the milk and leave to soak, while you prepare the vegetables.
Steam the diced carrots, beans, peas and cauliflower until just tender. Boil the cubed potatoes until just cooked. Do not overcook. Keep the diced mushrooms aside.
Shallow fry the paneer cubes in a little oil, until just golden, drain on kitchen paper, and keep aside (you can skip this step if pressed for time)
Heat the oil in a deep pan. Add the cinnamon stick, cloves and cardamom and saute for 1 minute. Add the onions, and cook gently for about 5 minutes, until the edges start to brown. Add the ginger and garlic, and fry for another minute.
Add the tomato puree, and the spices (coriander, cumin, garam masala, chilli powder and turmeric) and mix well. Add a little hot water if the masala is too thick. Cook on a gentle heat for about 10 minutes, stirring to stop the mixture sticking to the bottom, and adding more water if it dries out too much. You want the spices cooked well, and not hit the back of your throat.
In a powerful blender, grind the cashew nuts with the milk to a very fine paste. You can add a little more milk if the paste is too thick, it should be of pouring consistency. Clean the grinder with a little hot water and keep this water aside.
Add the cashewnut paste to the onion/ tomato masala, and stir together well. Add the cleaning water to the mix, until you get the desired consistency of sauce. The sauce should be thickish, but not overly so.
Now season the sauce to your taste. I usually use 1 tsp salt and 1 tbsp sugar. Stir well, and heat gently for another 5 minutes. If the sauce gets too thick, thin it with a little hot water (don't add too much at once, you will lose the creaminess of the sauce, its better to add a little at a time)
Taste, and adjust the seasoning.
Stir in the mushrooms. Cook for a minute, then very gently fold in all the steamed vegetables, potatoes, paneer and pineapple chunks. Heat gently for a few more minutes, the stir in the raisins.
Garnish the korma with the remaining cashews, fresh chopped coriander and a splash of cream. Serve hot with rice or naan.
Monday, 1 November 2010

We celebrated our first full on Halloween yesterday. Aditi dressed up as Dora the Explorer and her beloved Iggle Piggle was Boots :-) Kid came back from trick or treating with enough candy to last her for a whole year... maybe even two years!! Bad mommy confiscated most of the treats (treating herself to a couple sneaky bits, is it considered bad form to nick your kid's candy?)
And we had a lovely time with friends who dropped by for the whole North American Halloween experience. It was brilliant.
Anyway, in keeping with the whole gory theme, I decided to post this tomato soup I made a week or so ago. I can't stand the cold, so for me winter is just an excuse to make warm comforting soups. This one is the easiest one ever and cobbled together with ingredients we all tend to have at home, and tastes delicious with a crumble of herby goat's cheese melted on top. This does have a very pronounced and strong tangy, tomatoey taste, so season heavily if you want it less tomatoey. It stays vegan, unless you stir in some cream and the cheese at the end, which you can do, if you wish.
Recipe:
(Printable Recipe)
4 large, ripe field tomatoes, roughly chopped
1 tbsp olive oil
1 medium onion, chopped
2 flakes garlic, chopped
2 sticks of celery, chopped (opt)
2 sprigs fresh thyme
2 tbsp tomato paste, tinned or from a tube
Around 500 ml vegetable stock
Salt and pepper to taste
100 ml single cream (optional)
A stick or round of crumbled goat's cheese (optional)
Handful fresh chives, snipped
In a heavy pot, heat the oil, then add the onion, celery, garlic and thyme. Cook for around 5 minutes, not letting the onion colour too much. Stir in the chopped tomatoes and tomato paste. Cook on a low heat, stirring ocasionally for around 15 - 20 minutes, until the tomatoes are well mushed up. Add the stock and simmer on a low heat for another 5 minutes. Transfer to a blender and blend till smooth. Season well to taste. Reheat, till just steaming and serve with a sprinkle of chives.
If using, stir in the cream and return to the heat. Do not boil the soup, just heat till steaming. Crumble the goats cheese on top and put under the grill for about a minute till the cheese is bubbling. Serve with a sprinkle of chives.
Subscribe to:
Posts
(
Atom
)
