


Showing posts with label Pulses and Lentils. Show all posts
Showing posts with label Pulses and Lentils. Show all posts
Wednesday, 24 October 2012
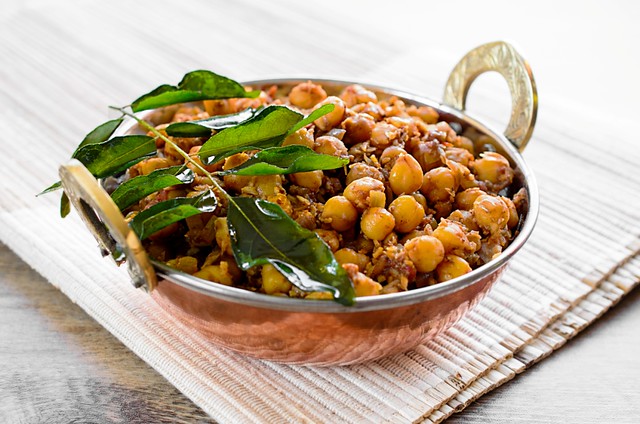
How do we define memories? How do we remember events, times, places, people? How is it that a fragrance, a taste, a picture, a thought can take us back to a different time, a different place?
It was a simple question, asked by Elizabeth Ng from CBC Radio that got me thinking. A few weeks ago, Elizabeth contacted me to see if I would be interested in an interview project she was working on. She wanted me to make a dish that brought back to me vividly, memories of my home and family. She was hoping to talk to my mum as well, and having me make the dish at the same time. I loved the idea of the interview, and agreed almost immediately, and called my mum excitedly.
Mum was pretty chuffed as well, but then asked me what she thought the dish that defined my childhood - and hers - was... and we both thought that it was this chickpea dish. My grandfather was a wedding chef. He was the person that people called when they were hosting large dinners (and I mean large, Indian style - between 500, 1000 people or more) This was one of his signature dishes, and while it is by no means an original one (a lot of Mangalorean wedding chefs have similar recipes) its the one that stayed with me, in its simplicity, but also its evocative fragrance that takes me right back to the kitchens of my mother and my grandparents.
Mum and I had both differening memories of this dish. My mum talked about how she remembered going to large wedding feasts with my grandfather, and how he would split ingredients around his helpers and make sure everyone was doing what they were supposed to. She described the heat, the noise, the glow of the firelights as everyone worked the night to make sure the feast was ready for the next afternoon. And while she spoke, I saw my grandfather, in his quiet, soft spoken, yet commanding way ordering everything about, with his basket of spices and meats. I saw him wringing the neck of a freshly bought chicken, then plunging it into hot water and defeathering it... with me being co-opted in to do the little ones that were hard for his large hands. I saw him tasting, spicing, salting, mashing... I remembered so much, so many memories! I also remembered my grandmother's food. She was the cook to my grandfather's chef. She was gentle, and delicate in her ways. She fed us congee and pickles and papads and kharam. She made the food we ate everyday and took for granted, just like my mum did all her life.
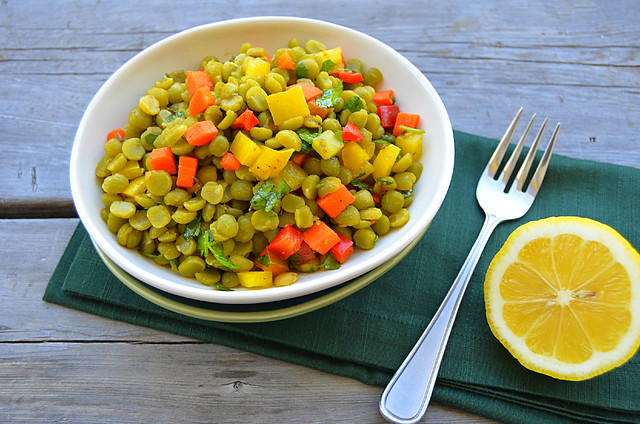
Friday, 16 March 2012
You've probably noticed a dearth of posts on this blog for a few days. I can only apologize for this. Its been a mad, mad March so far, and I've actually been working a lot. Add to this a visit from a dear friend from England and my in-laws, and its meant that I didn't have a ton of time to do a blog post.
However, I hadn't forgotten that I had to make a salad recipe for the Canadian Lentil's Recipe Revelations challenge. I mentioned this to my in-laws when we had a rare moment to sit down and visit. And to my surprise, my father-in-law mentioned that his cousin actually grows lentils on his farm in Saskatchewan. How is that for a co-incidence?
As this is going to be my last recipe for the challenge itself, I thought I might write a few things about Canadian lentils themselves, and perhaps a bit of background would be useful as well. As you already know, my daughter and husband don't eat meat. This means that they can be limited in their protein intake, and I have to be constantly aware of what I am feeding them, and if it has a good balance of protein in it. Lentils, I have found, are an amazing source of protein and also of fibre, and are so good for you too. Not to mention that they taste pretty darn good as well.
Lentils are versatile. You can throw them in a stew, or a curry, or make a dal. They are beautiful vehicles for spices, and a gorgeous accompaniment for meats and fish. Just yesterday, Kathryn and I taught a class where we paired beautiful nutty brown puy lentils with a pan fried salmon steak, and served it with green beans and a salsa verde. Simple, delicate, delicious and so healthy and good for you.
Monday, 5 March 2012
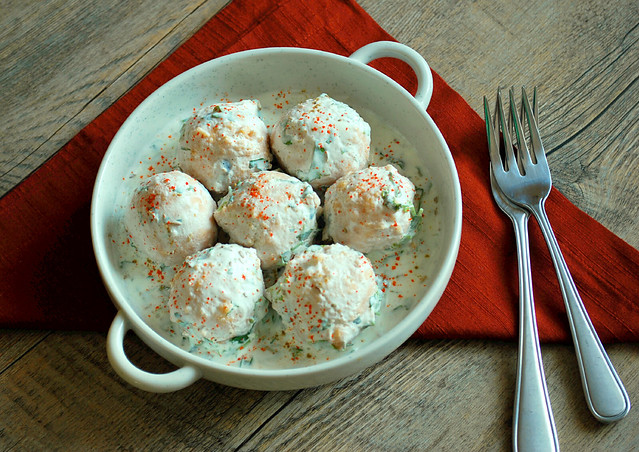

Sometimes, you need a little help from your friends! I wanted a pretty special recipe to enter into the 'Freestyle' category of the Canadian Lentils Recipe Revelations Challenge, and so I gave a shout out to my foodie friends for recipe ideas that I could make for this category.
The overwhleming consensus from my friends was that I should make dahi vadas. Dahi vadas, those spiced, crisp lentil fritters, out of the pan and into a delicately spiced, sweet, hot and tangy yoghurt sauce. They are a staple street snack in India, both in the North and South. The best thing about these fritters, though, is how easily you can make up your own spice combinations and add your own special touch to a classic.
This challenge, in a way, has forced me to rethink the way I make and write recipes. Pretty much all of my recipes are classics that I have reinvented to suit the way I cook, and to avail of the fresh ingredients I get here. So while I turned to my beloved Mangalorean Ladies Club Cookbook for inspiration, I actually decided to go my own way with this particular recipe and tested it a few times to make sure I got my own brand of individuality on it. Of course, some recipes you don't mess around with, but at the same time, I do consider my cooking a canvas, on which I use my creativity and all my local ingredients to 'paint' a beautiful dish that is full of lovely, fresh flavours and, sometimes, a twist on old, classic recipes.
Tuesday, 21 February 2012
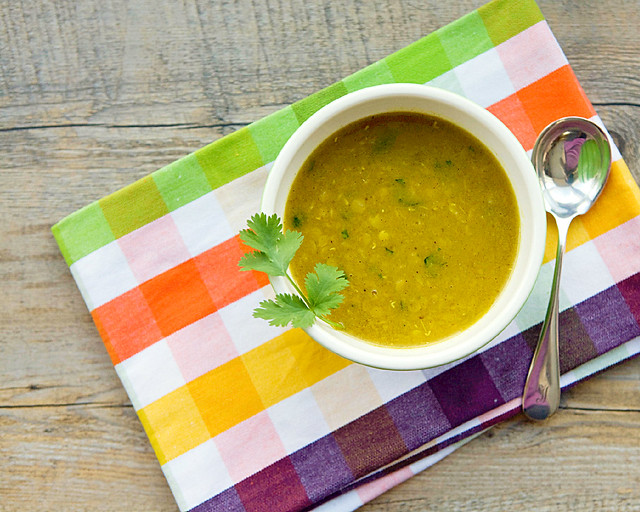
There are some recipes that are a staple in our house. This vegetarian mulligatawny soup is one of them. I've been making this soup for a long time now, and I have no clue how I started making it in the first place. It could have been the damp, cold climate of England that may have kickstarted the idea for this warm and comforting soup. Or it could have been a desire to make a soup out of what is essentially an Indian dal. Whatever the origins of this soup, one thing that cannot be denied is that it's just utterly delicious, and unbelievably versatile. I have chucked vegetable odds and ends into this soup, along with beans or chickpeas. I have once, sneakily, thrown in some chicken when Kay was away, and I didn't want to bother with making full meals.
Mulligatawny is an interesting dish, from the perspective of an Indian. Its almost akin to the other Anglo-Indian dish, Kedgeree, in its nature. There are quite a few theories as to its origin. The first one claims that its a British corruption of the Tamil words 'milagu-thani' or 'spicy water'. However, the problem with this theory is that the dish that is being referred could well be 'rasam', the broth like spicy condiment from the South of India. And a classic Western mulligatawny soup is very different from a rasam.
The Western version of Mulligatawny is a thick soup, rich with soft lentils and ocasionally thickened with coconut milk. I once tasted a Mulligatawny soup in Terrace, BC with my in-laws and I was struck at how different it was to the one I make. For starters, it had rice in it, which for me has always been a no-no. The flavours were also very different to my recipe, and while it was decent, it wasn't what I was used to. I made my version for the in-laws, and they both said that they preferred my version better (yipppeee, success!)
Friday, 17 February 2012
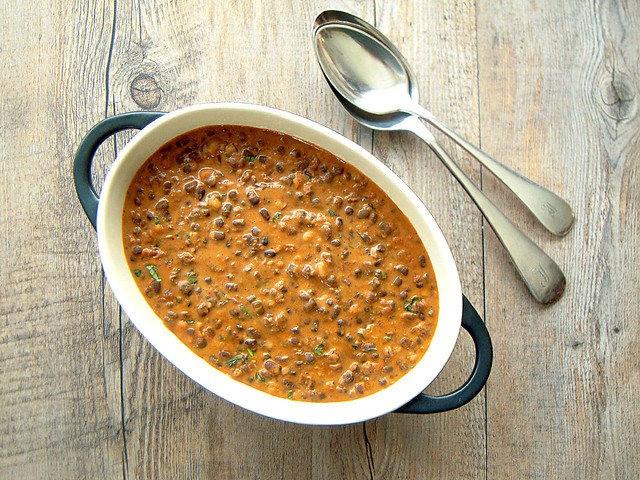
When Canadian Lentils invited me to take part in their Recipe Revelations challenge, I totally jumped at the opportunity. Because, if you all read this blog fairly regularly, you'll know that I have a vegetarian daughter that needs protein. What better way to stuff her full than by using lentils?
I cook with lentils pretty frequently. From Masala Dal to Biscuit Ambade, lentils feature at least a couple of times in my kitchen. However, as the challenge required an original recipe, it took me some time to think of something that I hadn't already featured on the blog.
In the end, I plumped for this Indian classic, Dal Bukhara. Dal Bukhara is famous all over India. Its the signature dish of the Bukhara, a restaurant at the ITC Maurya Hotel in New Delhi. Famous for its tandoori (clay oven) dishes, the recipe for this slow cooked dal is a hugely guarded secret. I have eaten the original dal, and let me tell you, its an experience that can never be forgotten. Soft, creamy lentils almost melt in your mouth, and the mellow, yet fiery spicing takes a while to materialise on your tastebuds. Every bite, with a soft naan, is a sensation. Its truly an experience in itself and, as I can attest, unbelievably hard to replicate. I can totally understand all the rumours that swirl around this dish, from the one that says it cooks in a slow tandoor for twelve hours, to another that claims the use of almost twenty spices. All these rumours didn't make my task of trying to recreate this dish any easier :-)
Friday, 23 September 2011
Have you ever hated anything as a kid and started to love it as an adult? I posed this question on this blog's Facebook page a few days ago, and got a wide variety of answers, from avocadoes and fish to sorpotel [though how anyone can hate sorpotel is beyond me!!!] When I first started weaning Aditi, one of the best pieces of advice that someone gave me was not to assume that just because I hated something it automatically meant that Aditi would hate it too. That advice has served me well, and surprisingly, has also led me to try things that I used to hate as a child.
The reason I asked the question on my page, is because I realised after quite a few years that beet greens are not the enemy after all. My mum always used to say that beet greens make your 'blood redder'. I finally figured out that she meant that they were high in iron, geez mum, talk about cryptic clues :-) And I do need all the iron I can get as I have always been on the anaemic side. But I hated those greens as a child, however my mum cooked them, and only serious threats would make me eat them. Mostly I would hide them under my rice or try and feed them to my numerous cats and dogs!
I don't know why I didn't like them. Perhaps it was the slightly bitter edge to them, or the crunchiness? Who knows the mind of a child anyway? For example, Aditi won't eat eggs at all, however I cook them. When I ask her why, she says that she doesn't like that they have been taken away from the hen! An ethical kid, just what I need, when I am already struggling to make sure she has a balanced diet.
Wednesday, 6 July 2011
Have you ever caught yourself doing something with your child that your own mum used to do when you were little? Or promising yourself that you would never say that one thing, and suddenly, before you know it, you're yelling out 'don't make me come over there...?' Oh yeah! You totally do, right? Even if you aren't a parent, you still catch yourself doing or saying something that your parents used to do. Now 'fess up, and don't deny it :-)
I found myself doing this with Aditi today. As I have previously moaned on here, getting that kid to eat protein that isn't milk based is a serious challenge. Even though she's generally an easy kid to feed, sometimes she has to be coaxed to eat... especially when the weather is hot or she's knackered. And of course, all that crabbiness translates into crabby mum too. So my latest coaxing is something most mums will recognise. Come on now - one bite for grandma, one bite for grandpa, one bite for mummy, one for daddy, one for the cat... and so it goes on until the bowl is empty. And then you wonder how long before they catch on to this one, like they did with the 'ooppeeenn the tunnnnelll, train coming through'! Well, it works, and I refuse to think of anything else beyond that!
Sunday, 10 April 2011
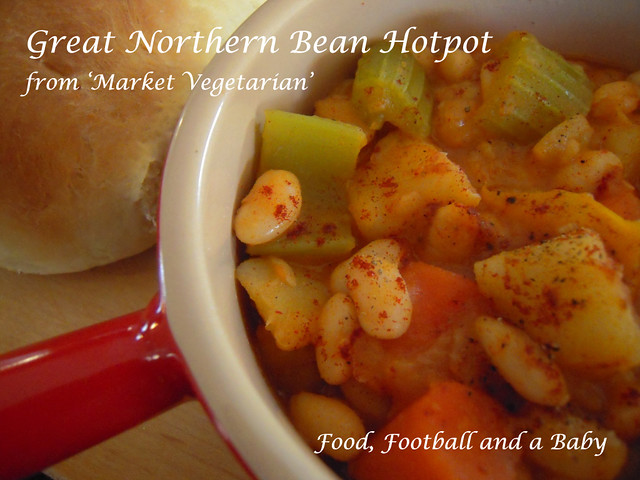
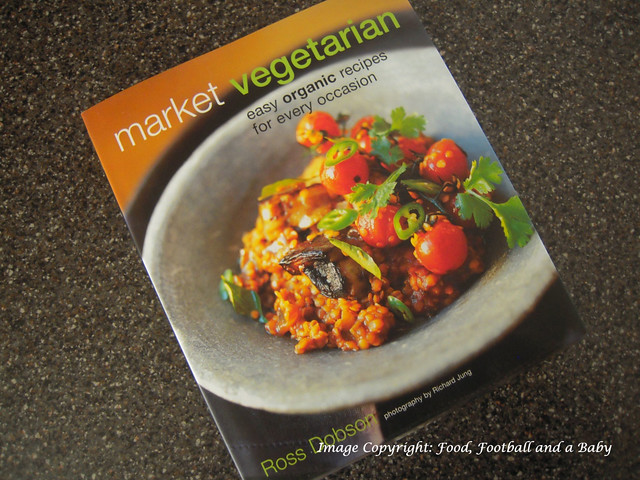
I was chuffed to bits when I won Jacqueline's Slow Cooking Challenge over at Tinned Tomatoes. I was even more pleased because the prize was a copy of 'Market Vegetarian' by Ross Dobson. When the book arrived this week, I was so excited, that Kay commented that I was acting like I'd never won anything in my life. Well, I hadn't... not after those singing competitions in college anyway :-)
Monday, 14 March 2011
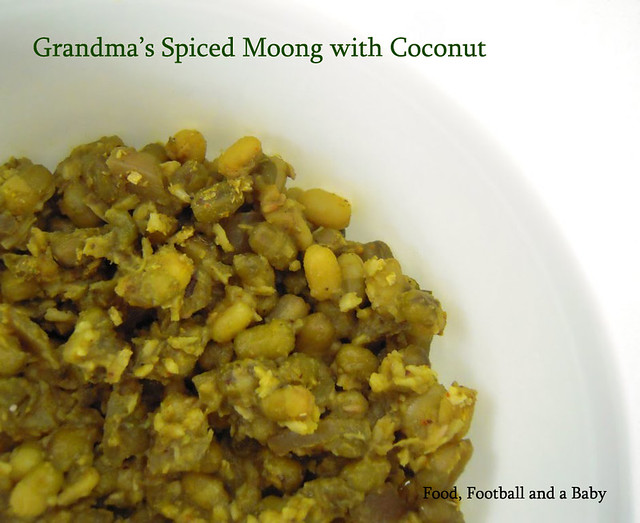
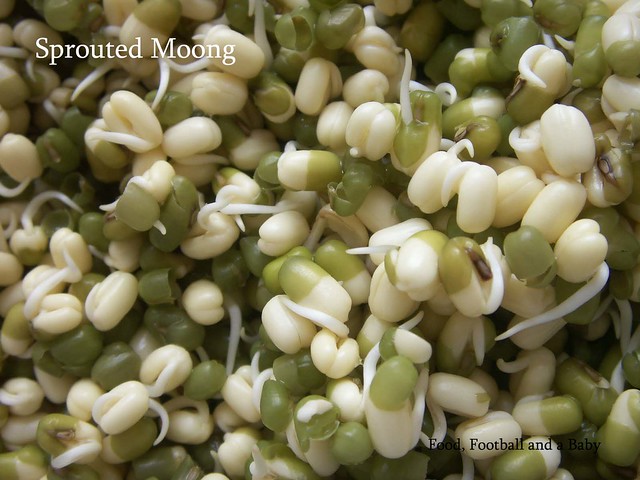
This recipe is from my dad's mother, my Mamma, who is pushing 94, and looks 80, according to her :-) I was visiting my aunt in Toronto one year, and Mamma happened to be there visiting as well. She is quite a foodie, and has loads of recipes that she got from all over, including her own mother. This particular one, I got off her, as my aunt was cooking it. I love it, as sprouted moong dal (also known as mung beans or green gram) are beautifully healthy and so good for you.
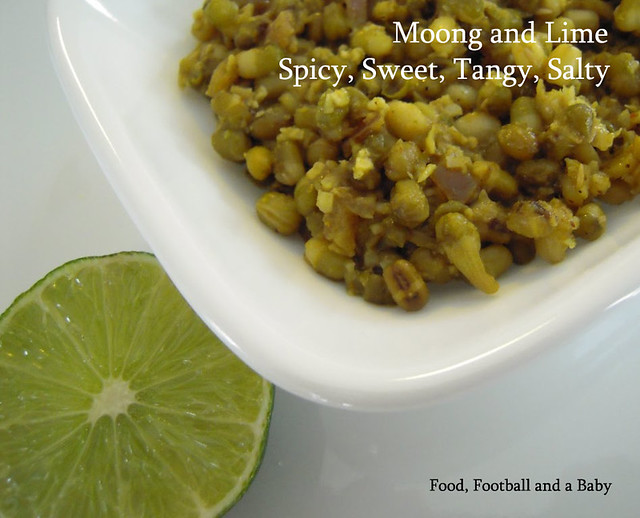
I love all the different textures in this dish, its spicy, but with a beautiful hint of sweetness from the moong and the coconut, and its got a distinct tang from the lime juice. The pictures may not look like much, but trust me this is one book you don't want to be judging by its cover :-) The complexity of flavours is unbelievable, and what's even more cool is that my grandma told me that she'd come up with this recipe on her own, as she had run out of some spices. So she improvised, and the result was so well loved, she continued to make it like this. I, for one, am glad she did, as its a firm favourite in our home. Kay told me that it tasted like India, and I thought that was such an apt description for this simple, but stunning, side dish.
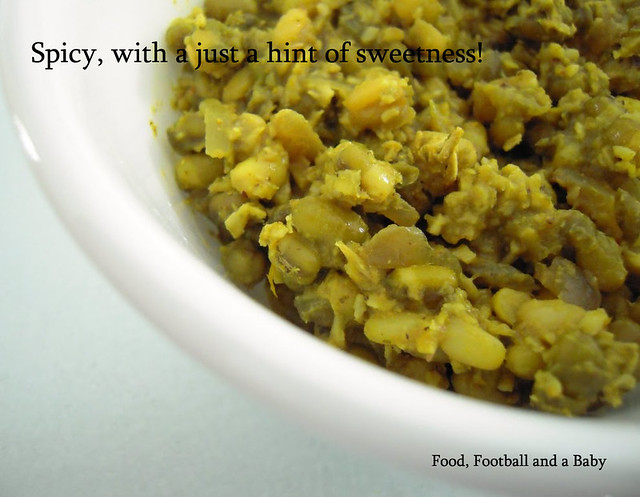
With a pescitarian husband and a vegetarian daughter, I have to make sure that the food I cook has to be to both their tastes, plus nutritious, which is a challenge. But being from India, the home of the vegetarian, life's been a lot easier. I cut down significantly on the oil too, to make it healthier. I also kept the spice level quite mild, so feel free to play around with a bit more heat.
To sprout the moong, leave it in a bowl of warm water for about 24 - 36 hours, or until the moong sprouts. Like this
Recipe:
(Printable Recipe)
2 and half cups moong
Salt to taste
1/2 cup water + a little more, if required
1 sprig curry leaves
1 medium onion (chopped)
1/2 cup dessicated coconut (fresh, frozen or dried)
1/2 lime or lemon
1 tbsp oil
To grind together:
3 – 6 dried mild long red chillies (
1 small onion (chopped and fried)
4 flakes garlic (pounded and fried)
1 tsp coriander seeds
10 peppercorns
1/2 tsp whole cumin seeds (
1/2 tsp turmeric
A small bit of tamarind or 2 tbsp tamarind paste
Method
Soak the moong in warm water until sprouted (it takes about 24 - 36 hours, depending on how warm it is outside)
Toss together the chillies, coriander seeds, cumin and peppercorns in a heavy pan, until toasted. Blend the spices with the fried onion and garlic, with a little water, until finely ground.
Fry the chopped medium onion and the curry leaves together in a little oil.
Add the finely ground masala and fry gently till the initial rawness of the ground spice starts to disappear (about 8 to 12 minutes)
Add the water, salt and the sprouted moong and bring to the boil. Simmer gently till all the raw smell of spices disappears. Taste and adjust seasoning. Squeeze the juice of 1/2 a lime or lemon on top.
Stir in the dessicated coconut, at the last minute.
Serve with boiled rice or chapatis.
This recipe is going to Lisa's Vegetarian Kitchen for No Croutons Required. The theme for March is Mung or Adzuki Beans, and Lisa has relaxed the rules to allow for a casserole too, instead of just soup or salads.
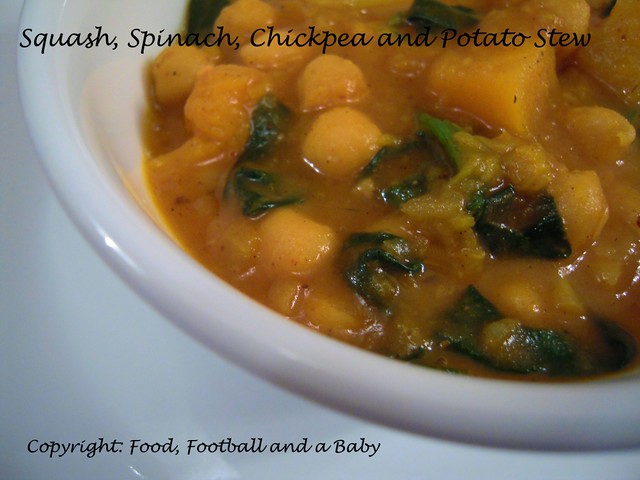
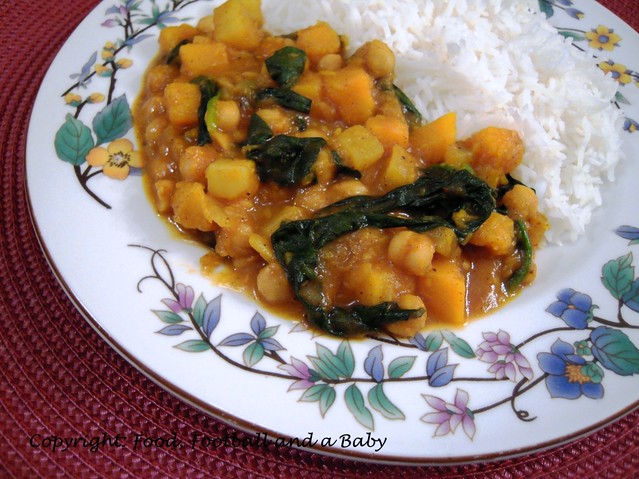
Wednesday, 2 March 2011
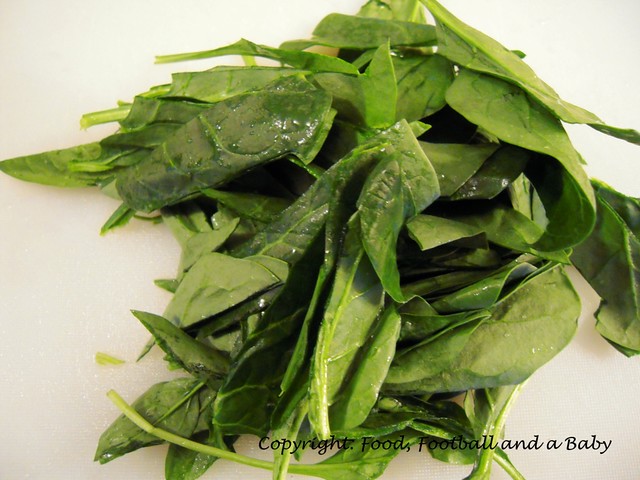
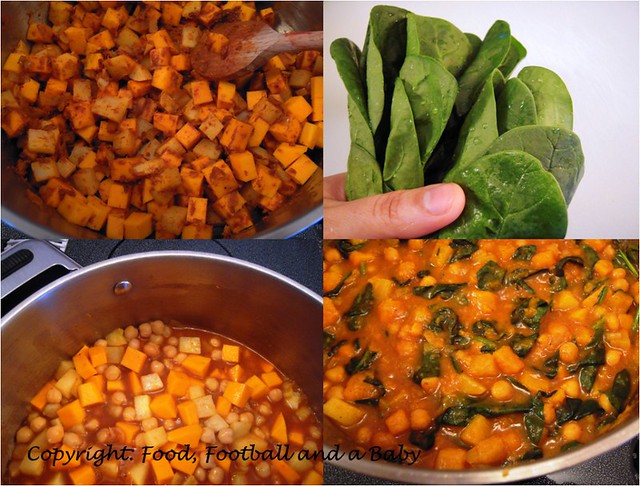
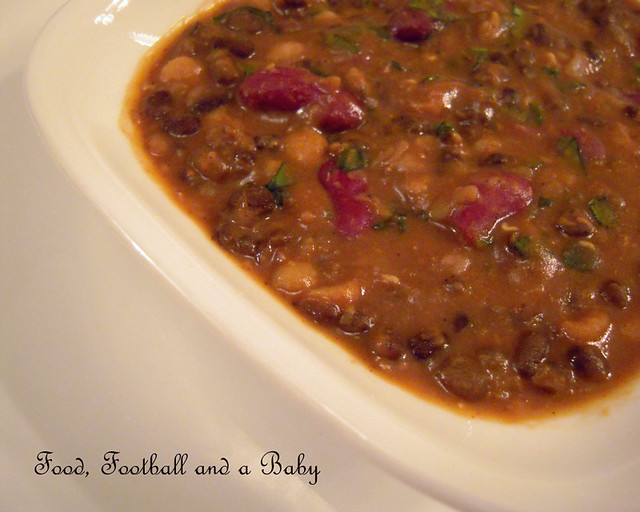
One of my most memorable dishes is a very simple chickpea and spinach stew that a friend made for us back in Terrace. Our friend, lets call him DS, is always super busy, being a very well respected and loved doctor in the community. As our families are quite close, we get invited over to dinner to his whenever we go to Terrace to visit. DS owns a slow cooker, and he almost always makes a dish in it that is perfectly cooked, and beautifully spiced.
I remembered that particular dish when Jacqueline over at Tinned Tomatoes challenged us to come up with a dish for the slow cooker. Now, unfortunately, I don't have a slow cooker (now added to the ever growing list of appliances that I really really need), but as Jacqueline says, the dish doesn't really have to be cooked in a slow cooker, just be suitable for it.
I looked all over for that particular recipe of DS's, but had no luck. I called MIL who figured that DS must have got it from one of his numerous slow cooker cookery books, but of course, I couldn't particularly ask him to remember a dish he'd served me over five years ago :-) So I decided I would try and recreate the taste myself.
I had some help from a Canadian Living recipe, but I adapted it quite heavily, in addition to making my own Madras Curry Powder. In the end, I was thrilled to discover that the stew tasted very much like that long remembered taste of DS's stew. It was mild enough that Aditi (who is usually quite wary of spicy food... yes, this is my daughter!) scoffed a whole lot, and asked for seconds. But it was flavourful enough for me and Kay, who is usually quite particular about his stews. The addition of all the lovely veggies made it very nutritious, and if you skip the coconut milk, its beautifully healthy too.
What more can you ask of dinner, pray tell?
Recipe:
(Printable Recipe)
1 small butternut squash, cubed
2 medium potatoes, cubed
1 400g tin of chickpeas, drained
A big handful of fresh spinach, washed and torn roughly
1 tbsp oil
1 medium onion, diced
1/2 inch piece of ginger, grated
2 fat garlic cloves, microplaned or smushed to a paste
2 tbsp Madras Curry Powder (if using store bought, use the mild variety)
3 - 4 tbsp tomato paste
400 ml hot vegetable stock
Around 100 ml light coconut milk (optional)
Salt to taste
Method:
(I will give the method I used to make the stew first, then the slow cooker method)
1. In a big pot, heat the oil on a medium heat, and add the diced onion. Fry for 3 - 4 minutes, until the raw smell disappears, then add the ginger and garlic. Sauté for an additional minute.
2. Add the curry powder and the tomato paste, and fry together for 5 - 7 minutes, adding a teeny dash of water if the mixture is too dry.
3. Add the cubed squash, potatoes to the onion mixture. Stir, then add the hot vegetable stock. Simmer for 5 -6 minutes, then add the drained chickpeas. Stir everything together, and leave to simmer on a low heat for 10 - 15 minutes, or until the potatoes and squash are tender.
4. Season to taste.
5. Stir in the spinach, and cook for a few minutes, until the spinach wilts.
6. Swirl in the coconut milk just before serving.
7. Serve with rice or any Indian bread.
Slow Cooker Method:
Follow steps 1 and 2 in a heavy pan instead of a pot. Place the cubed squash, potatoes and chickpeas in the slow cooker. Add the onion-tomato mixture and the stock. Stir together, then cook on its lowest setting for roughly 4 hours. Open the cooker and stir in the spinach. Cook an additional 5 minutes. Season to taste. Swirl in the coconut milk just before serving.
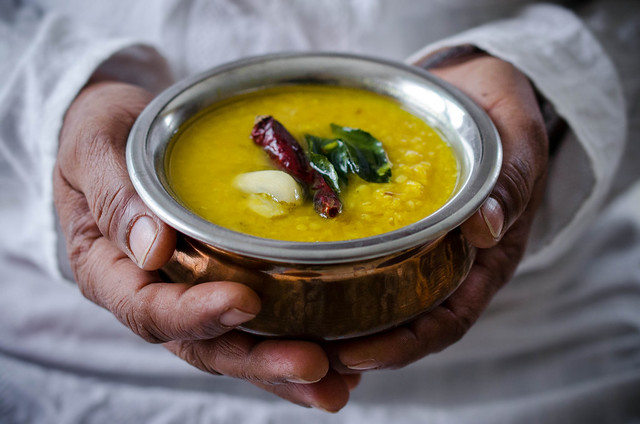
Friday, 11 February 2011
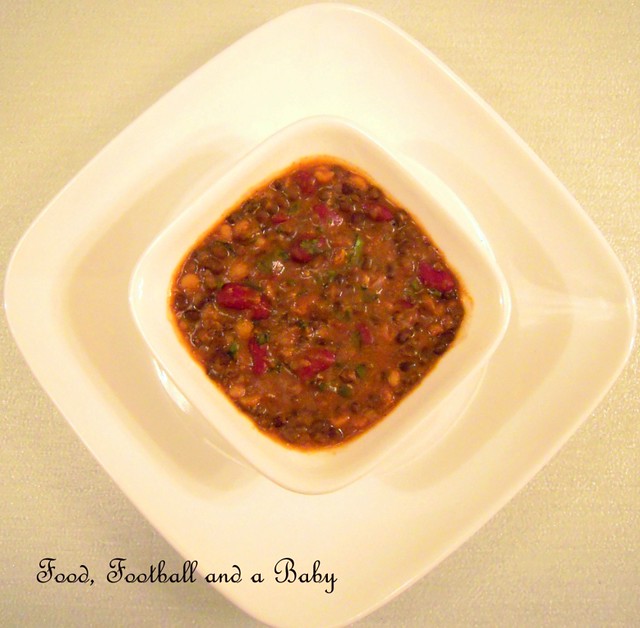
We had a few people over for a Superbowl party. Now, I freely admit, that my interest is not in that kind of football, but hey, any excuse for a party. And the game wasn't too bad either!
I wanted to keep the food simple, but delicious, and ideally something I could cook up the night before. So I decided on my specialty, prawn biriyani, because I could make the sauce the previous night, and I wanted a dal to go with it.
I was wondering if I should go with just plain tarka dal, but it seemed a bit pedestrian for a party. I wanted something a bit more fancy, which looked like I had made a little more effort. So I picked my second favourite dal, Dal Maharani. Dal Maharani is very similar to Dal Makhani (dal with butter) and Dal Bukhara (the famous dal from the Bukhara restaurant in Delhi). The only difference seemed to be the addition of chana dal (yellow split peas) and red kidney beans, and a slightly different spice mix.
I made up the recipe for this dish, as I was trying to recreate the taste based on the Dal Bukhara I remember eating. So it felt like I was doing a lot of 'add a little of this, and maybe a little more of that... nah, doesn't taste quite right, add more of this etc.'... but, in a rare moment of organisation, I actually kept jotting notes of what I was adding to it. Shocking, I know, but it actually meant that I could blog the recipe, without trying to remember how the heck I cooked it.
This dal does take a long time to cook, especially if you have no pressure cooker like me, but after the initial work putting it together, it basically just simmers away on a low heat, while you stir it ocasionally, so not super labour intensive! The longer you simmer it, the better it will taste. And it tastes terrific the next day, and freezes well too. So you may as well as make a big batch and freeze in meal sized portions for a quick dal fix!
Recipe:
(Printable Recipe)
2 cups whole black gram (black urad/ urid dal)
1/2 teaspoon baking soda (bicarb of soda)
1 cup chana dal (yellow split peas)
2, 1 inch pieces of cinnamon
2 dried or fresh bay leaves
For the spice mix -
1 tbsp whole coriander seeds
1/2 tbsp whole cumin seeds
1 tsp fennel seeds
2 long mild red chillies
2 inch stick of cassia bark or cinnamon
4 - 5 whole cloves
2 pods cardamom
1 small petal of star anise (not the whole flower, just a petal)
1 dried bay leaf
To make the dal -
1 medium onion, diced very fine
3 cloves garlic, microplaned to a paste
1 inch piece of ginger, microplaned to a paste
1 tin of tomato paste (roughly 6 oz)
1/2 - 1 tsp hot red chilli powder
2 - 3 tbsp hot water
1, 400g tin of red kidney beans in water, don't drain
2 cups plain yoghurt
3 tbsp olive or vegetable oil (don't use extra virgin olive oil)
Salt to taste (I used 2 tsps)
To finish -
1/4 cup light cream (half and half)
2 tbsp butter
Fresh coriander, chopped
Method:
In separate bowls, soak the chana dal and the black gram separately in cold water overnight, or at least for 6 hours.
The next day, put them into separate pots (adding the bicarb/ baking soda to the black lentil pot), and cover with water. Bring to a boil, then turn the heat down and simmer until both the dals are cooked. It will take roughly 30 -40 minutes for the chana dal and around 1 hour for the black gram. Both the dals should be soft, but still be able to hold their shape. If you have a pressure cooker, cook both dals separately, until soft.
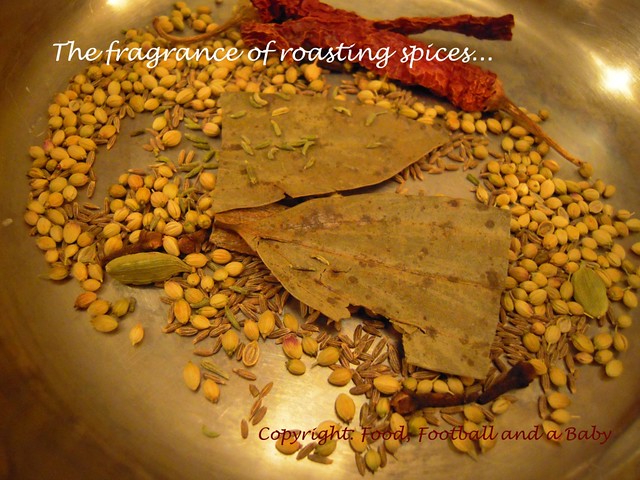
To make the spice mix, toss the spices together in a hot, heavy pan for about 1 minute, till they smell heavenly. Grind to a fine powder in a powerful blender.
In a big pot, heat the oil, and add the finely diced onion. Cook, stirring for 4 - 5 minutes, until onion is soft and just beginning to colour. Add the ginger and garlic, and cook for another minute. Add the tomato paste, ground spice mix and red chilli powder and stir till well mixed. You may have to add the hot water to make this mixture a bit looser. Cook together for 15 minutes or so, adding a little more water if the masala is too dry.
Now add the cooked dals and the tin of kidney beans (water and all) to the tomato mixture. Stir well, then add the yoghurt and salt. Stir together, taste and add more salt, if required.
Now simmer this mixture on a very low heat for at least 30 minutes (ideally 1 hour), topping up with a little hot water if its drying out. Taste again, and adjust seasoning as required.
Note: If freezing, let the dal cool at this stage and freeze in meal sized portions. Reheat, and then add the cream and butter to serve.
Just before serving, add the cream and butter to the dal, and stir well. Garnish with fresh chopped coriander. Serve hot with naan or rice. This tastes delicious the next day.
Friday, 21 January 2011
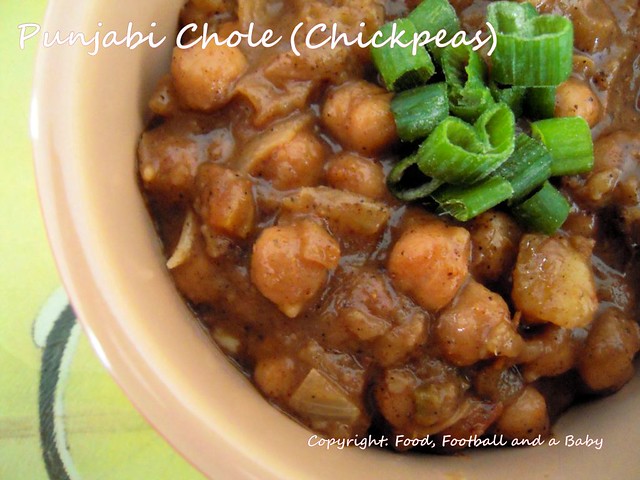
There are always some days when you crave the taste of something that came in a ready meal packet. Yes, you read that right, a ready meal packet. I almost never buy ready meals, but I make an exception for Ashoka Punjabi Choley. I love the taste of the plump chickpeas cooked in a spicy sauce, quintessentially Indian!
However, since moving to Edmonton, I found that I very rarely have the chance to go to Asian supermarkets (which I haunted when we lived in England), which means my stock of packets of chole was sadly depleted.
So, as necessity is the mother of cooking, I decided to get off my lazy backside and have a stab at making them myself. I make a version of chana masala, which is good, but its not Punjabi Chole. So I started looking around for a good recipe.
I follow an amazing blog called 'A Mad Tea Party'. When I googled 'Punjabi Chole' the first hit was Anita's recipe. It looked awesome and after drooling for a while over the pictures, I hit my kitchen cupboards.
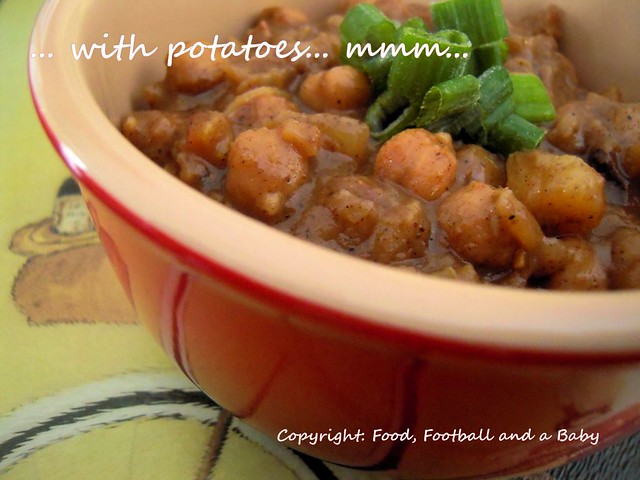
I adapted Anita's recipe a little bit, as I did not have a few ingredients and my essential laziness meant that I certainly wasn't going to be organised enough to soak the chickpeas and cook them. I also had to leave my pressure cooker behind in England (sob, sob) so it would have taken a long time to cook them. So I went with tinned chickpeas and tomatoes. I also substituted a few spices as I had run out of a few (I really need to get to a Asian store soon!!) and added potato cubes to the chole to make them a bit more substantial. I also skipped the chilli powder and slit green chillies, to suit the spice tolerance level in our house.
The dish is still fairly spicy, but Kay was able to handle the spice well, so I haven't bothered reducing the ground spice content. If you want it less spicy, just reduce the peppercorns which are the source of heat in this dish. Anita's dark roasting method, which I had never tried before, made a huge difference to the dish and the taste was very different to the chole you get in a restaurant.
The end result was that this concoction tasted divine. Not super authentic (I highly recommend you try Anita's recipe if you want to be authentic), but still absolutely delicious! Just like the stuff from the packet tasted, but better (I know, just humour me, OK) It immediately became a new favourite in the house, and its freezable to boot, so a huge success all round!!

Recipe:
(Printable Recipe)
500 g or so, tinned chickpeas
1 large potato, cubed into small dice, and boiled till just tender.
1 large onion, diced fine
1 250g tin, chopped tomatoes
1 garlic clove, grated
1 inch piece of ginger, grated
2 tbsp oil
Salt to taste
For the spice mix:
2 tsp coriander seeds
1 tsp cumin seeds
1 inch piece of cassia bark (or cinnamon)
3 whole cloves
3 black cardamoms (opened and use the seeds only) or substitute 4 green whole cardamom pods, like I did
1 pod marata moggu (optional, but adds a really smoky taste to the dish)
1 tsp whole black pepper
2 dried long mild red chillies
1 big dried bay leaf
To garnish:
1 spring onion, sliced or handful of fresh coriander, chopped.
Method:
Put all the spices into a heavy pan, and roast, stirring constantly, until they are almost black in colour. They don't have to be jet black, I roasted mine to a dark brown colour. Transfer to a powerful blender or spice grinder and grind to a fine powder.
Note: You can double or triple the spice recipe, and store the ground spice in an airtight tin for use later as well. Of course, fresh ground spice does taste a lot better.
In a pan, heat the oil, and cook the onion on a medium heat till soft and starting to brown round the edges. Add the ginger/ garlic and stir for an additional minute.
Add the tomatoes to the mixture, and cook, stirring until the tomatoes are very squishy. Add the ground spice mix and salt to taste. Cook down, stirring for about 10 - 15 minutes, until the masala is fairly dry.
Add the chickpeas, along with any water in the tin, and the potatoes, and stir together gently. Simmer for an additional 5 minutes. Garnish with spring onions or fresh coriander and serve with rice, roti or naan.
Friday, 10 December 2010

Chattambades are a delicious street snack from the Malabar coast. I thought they were pretty unique to Mangalore, until I had the Masala Vada in a London Kerala/ Sri Lanka restaurant (yes, really, the place is called the Palm Palace and its bang opposite Quality Foods in Southall!) and realised they were one and the same. Of course I then wanted to eat them constantly, and when my mum showed up in England, I was constantly badgering her to make them. She's a lovely mum, and she did. And they were delicious and tasted just as I remembered from Mangalore.
For some strange reason, for the past few days I had been craving these chattambades. The problem with making them is that they are really not a spur-of-the-moment snack. While chana dal or yellow split peas and curry leaves are a staple in my pantry and freezer, you do have to be fairly organised to soak the dal the night before, as its are ground raw with the seasonings. As usual, I tend to keep the spice down as Aditi doesn't really enjoy very spicy food but loves these chattambades. So feel free to increase the spices to your taste.
Anyway, to cut a long story short, I got myself organised, and I soaked the dal the night before. The next day yielded these delicious crispy, chewy snacks that we all gobbled down with coconut chutney and hot cups of chai.
Now that is what I call beating Old Man Winter flat down :-)

Recipe:
(Printable Recipe)
1 and half cup chana dal (yellow split peas)
1 or 2 long mild red chillies (alternatively, substitute 1/4 tsp hot chilli powder)
3 - 5 whole peppercorns
1 or 2 green chilli, chopped
1 sprig of curry leaves, fresh or frozen, chopped roughly
1/2 tbsp gram flour (chickpea flour)
1 tbsp rice flour (opt)
Salt to taste
Enough oil to deep fry
Method:
Soak the dal with double the volume of cold water, overnight if possible, otherwise, at least 6 hours. The dal will fluff up a little bit, as it absorbs the water.
The next day, drain the dal well and grind coarsely with the red chilli or chilli powder and the peppercorns, WITHOUT adding water. Don't process into a smooth paste as you want pieces of whole dal, it really adds to the texture of the finished vadas.
Scrape out the ground dal iunto a bowl, and add the chopped green chillies, curry leaves, gram and rice flours. Mix thoroughly, then season with the salt to your taste.
Shape into small balls, then flatten slightly using the palms of your hands (chatte (flat) ambade (vada), hence, chattambade)
Heat the oil until a drop of the vada batter rises quickly to the top covered in bubbles. Then drop in the chattambade, and deep fry until they turn golden. Take out of the hot oil, and drain on kitchen paper. The chattambades should be crispy on the outside and moist and chewy on the inside.
Serve hot with coconut chutney or ketchup and a hot cup of chai!!! Bliss!!
PS - I've been told that authentic chattambade does not have gram flour in it. I do know that, and I don't claim any authenticity with my recipes. They have been worked out by trial and error, and are based on what we like to eat. Also, as with all recipes, every single household will have their own for almost everything, a teaspoon extra here, a tablespoon over there, and that's how it should be :-)
Wednesday, 8 December 2010
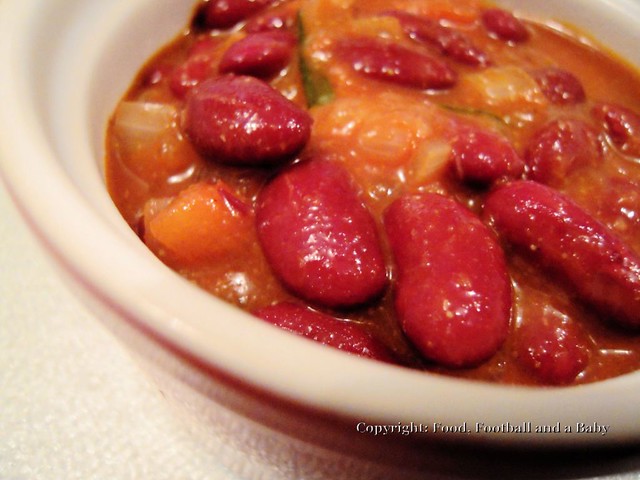
I've had a busy week, and I have been cooking non-stop thanks to a glut of birthdays. So I reached a point where I just didn't feel like spending hours in the kitchen. Not that I spend hours there normally, but, you know! I still need to get dinner out to the table, but I want to do it quickly and with minimum fuss. At the same time it has to be nutritious and appealing to the young and the old in the family.
This is where rajma or red kidney bean curry really has its moment. Its a simple tomato based sauce, delicately spiced with a hint of heat at the end. Most Indian households will have a recipe for this delicious side dish. We are lucky enough here that we don't need to cook the beans from scratch as they come in tins, making this a store cupboard staple as well. I always have kidney beans, chickpeas, passata or diced tomatoes in the pantry, and there are times when they make my life immeasureably easier.
This version of rajma is very lightly spiced and not super hot. If you want it spicier, increase the green chillies and the red chilly powder and sprinkle over julienned ginger strips as garnish. I prefer to keep it simple with a sprinkle of fresh coriander at the end. This recipe works better with strained tomatoes or passata as it adds a rich red colour to the curry, but feel free to substitute with just fresh tomatoes instead.
Traditionally, rajma is eaten with rice (rajma - chawal) but I serve this rajma with couscous, saving even more time and energy.

Recipe:
(Printable Recipe)
1 tbsp olive or vegetable oil
1 medium onion, diced
1 tbsp ginger garlic paste (or 1 inch ginger and 2 flakes garlic, grated)
1 small hot green chilly, finely chopped
2 medium fresh ripe tomatoes, diced
1 tbsp ground coriander
1/2 tbsp ground cumin
1 tsp garam masala
1/4 tsp hot chilli powder
1 cup strained tomatoes, or Italian passata or tinned chopped tomatoes (I use passata)
1 tin red kidney beans (around 400g)
Salt and pepper to taste
Handful fresh coriander, chopped, to garnish
Method:
Heat the oil, then add the diced onions. Fry the onions till very lightly coloured, then add the ginger garlic paste and the chopped green chilly. Fry for another minute, then toss in the chopped fresh tomatoes.
Cook for 5 minutes or so, then add the ground coriander, cumin, garam masala and chilli powder. Fry for 3 minutes, and then add the 1 cup passata. Season with the salt and pepper. Stir well, and cook for about 5 - 7 minutes, until the masala comes together.
Into this masala, stir in the kidney beans, including any liquid, straight from the tin. Heat gently for 3 minutes or until the beans are heated through, then taste and adjust seasoning. Sprinkle over the fresh coriander to garnish, and serve with rice, couscous or naan.
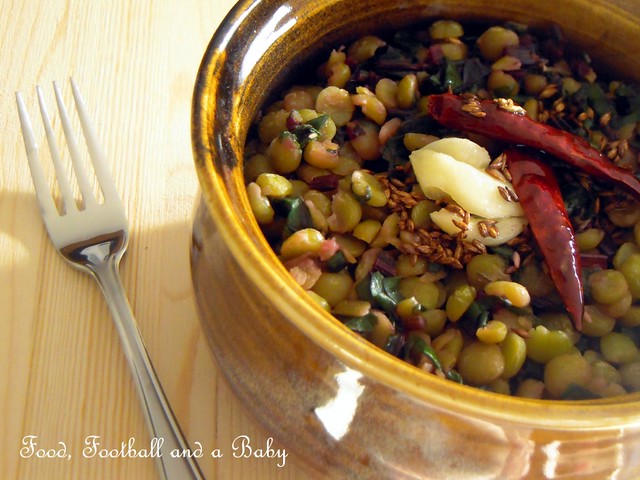
Tuesday, 19 October 2010
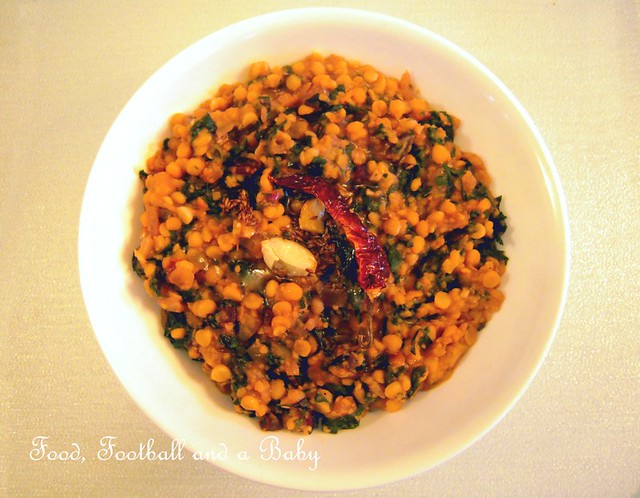
This recipe is based on one from my Aunt Edna. Its usually made using palak, or a version of spinach. However, I had a fresh bunch of Swiss chard in the fridge, given to us by the friend who runs the guerilla garden (yup, will tell you all about that soon!). I decided to see if Swiss chard would work instead of spinach in this dish, and it did. Worked a treat actually, since its cooked down with some delicious spices and really adds its unique taste to the finished dal.
We all know the difficulties of getting greens into little ones. Mine used to be an angel with food, she would just shovel down anything I put in front of her. However, for the last few weeks, she's become a little monster when it comes to food and trying new things. I've always been conscious of the fact that she doesn't eat meat, and recently has also started to refuse fish and seafood, so I need to constantly be on watch that she gets her protein and iron through diet. This easy dish ticks both the nutritional boxes, plus I serve it with rice, so she gets some carbs too. She actually tried this dal, for which I was grateful :-)
You can use palak or spinach in this dish instead of the chard, if you wish. Its easy to make, apart from the cooking time for the chana dal (split peas). It gets even easier if you have a pressure cooker (oh, how I miss mine) You can also make a big batch and freeze some of the dish. Just reheat and serve with rice and Indian pickle! It also works well as a side dish for a more elaborate meal. Just increase the quantities to feed more people!
Recipe:
(Printable recipe)
1 1/2 cup chana dal (yellow split peas), picked over and rinsed (325ml)
1 medium onion, diced
1 medium tomato, diced
2 flakes garlic, chopped fine +
1 inch piece of ginger, chopped fine
1 green chilly (add more for increased spiciness, but 1 works well)
1/2 tsp chilli powder
1/2 tsp ground turmeric
1/2 tsp ground black pepper
Around 8 cups loosely packed Swiss chard leaves, shredded into thin strips
Salt to taste (or 1 tsp)
1 tbsp oil
For the tadka (tempering):
1 tbsp oil
1/2 tsp cumin seeds
1 dried long mild red chilli
1 flake of garlic, smashed, but left fairly whole
Method:
In a pot, cover the split peas with water, and boil till the lentils are cooked and soft (around 45 minutes). Drain and rinse the cooked lentils. Return to the pot and crush roughly. Season with the salt.
In a shallow pan, heat the oil. Add the onions and fry for about 5 minutes, till just starting to brown around the edges. Add the ginger, garlic and green chilli to the pan. Fry for another minute. Add the diced tomato, and the chill powder, turmeric and pepper and cook for a further 5 minutes, until the tomato is soft. Throw in the shredded Swiss chard, and cook until the chard is wilted completely, another 5 - 7 minutes.
Combine the onion and spice mixture with the cooked lentils, adding a little hot water (around 1/4 cup) so the dish isn't too dry. Mix well.
For the tempering, heat the oil in a small pan. When the oil is hot, add the cumin seeds, red chilly and smashed garlic. Fry for 30 seconds, then pour the whole lot into the lentil mixture, covering immediately to keep in the aromas. Give the dish a good stir before serving.

Sunday, 9 May 2010

These are English baked beans, and very different to the North American versions. I really really wanted baked beans on toast, but the first time I tried the Canadian version, I was just like... no, I need the Heinz Beanz. They are fairly difficult to get here, so I decided to try and make my own, as a bit of a challenge.
So I looked all over for a recipe, but to no avail as there didn't seem to be any around with the taste I was looking for. I tried Heston Blumenthal's version (all of it, followed faithfully) but did not like the finished version, and it didn't taste anything liked the tinned version [I know, I know, it tasted awesome, actually, but just not what I wanted :)] So I took some elements from him and cobbled together my own, which to my surprise, did actually taste like a version of the famous Heinz ones. Of course it doesn't taste identical [husband says they taste like Heinz, but with some complexity of flavour, don't know if he's being sarcastic or complimentary :)]. So its up to you to make it taste like you want it to by varying the different seasonings, but as a first attempt, this wasn't a bad one at all.
I used plain Italian strained tomatoes (also known as passata) in this version. The measurements are fairly approximate, as I threw in things rather than measured them out. So you do need to use your discretion and not take this recipe word for word. When mixing the beans with the sauce, you have to make sure that the beans are just covered with the sauce, as there may be a bit too much sauce for the beans. You don't want them too saucy. Any left overs freeze very well, just take out, defrost and reheat to serve again.

750g white beans (haricot or navy, I used small white beans)
1/2 teaspoon baking soda (bicarb of soda)
2 tablespoons unscented oil
1 large onion, diced
1 tablespoon chopped thyme or sage (or both)
2 cloves garlic, crushed
1 tablespoon chopped thyme or sage (or both)
2 cloves garlic, crushed
5 cups crushed tomatoes [I used passata or Italian strained tomatoes, plain, without any herbs
2 cloves
4 tablespoons Worcester sauce
1 teaspoons Tabasco sauce
1/2 cup sugar, or to taste
Salt to taste
Method:
Soak the beans in cold water overnight. The next day wash and drain them, then cover with cold water, add the baking soda, and cook them for about 1 hour on a medium heat till they are tender, and just beginning to split. Drain and keep aside.
Note: Here's an alternate method, if you aren't organized enough to soak overnight - Pick over and wash the beans, cover with cold water. Then bring to the boil over high heat, let boil for 4 minutes, then turn off the heat. Cover and soak for 1 hour, then cook as normal.
In a big, heavy pot heat the oil and toss the onion in it. Sauté for about 5 - 10 minutes on a medium heat and then add the chopped herbs and the garlic. Stir and cook for another minute or two, until the garlic is fragrant. Add the tomatoes, breaking them up a bit.
Add the Worcester and Tabasco sauces, cloves, sugar and salt. Stir and simmer for about 20 - 30 minutes. Let cool completely.
When cool, puree well in a blender till it turns to a smooth sauce. Return to the pan, taste and readjust seasoning.
Add the beans to the sauce mixture and cook on a low heat for at least 30 - 45 minutes, or more, until the beans are very soft. The beans taste better the next day when they have had a chance to absorb the flavours better, but they're not bad on the day either.
Alternatively, mix the sauce and beans in a heavy pan, cover tightly with a lid or foil and bake in a low oven (around 125 degrees C) for about 2 to 3 hours or until the beans are soft. If making the oven, keep checking to see that the beans haven't dried out. It may be a good idea to reserve some sauce to add to them if they are drying out.
Serve with a full English breakfast or on toast.
Wednesday, 22 April 2009


Subscribe to:
Posts
(
Atom
)
