


Showing posts with label Snacks. Show all posts
Showing posts with label Snacks. Show all posts
Monday, 4 November 2013
.jpg)
Winter's here in earnest. Halloween was (thankfully) warm(ish), but come the first of November, the snow's started, and yesterday we had almost a foot of snow. Now I'll be the first to admit that winter is not my season... but then I am grateful that it didn't start early this year like last year, where it was so bitterly cold in October. Winter this year is also mitigated for me, as I count down the days when I am heading to India for Christmas with Adz. + 28 C has never sounded so good!
That said, I know I haven't posted for a few weeks here. For the first time in almost four years, I was really really sick. The flu's been around for a while, but I've never felt this sick in a long time. Its taken me almost two weeks to get back to normal, and I still have the odd twinge here and there along with a lingering tiredness which is incredibly frustrating. Add that, and a whole slew of other things, and its not been a great month one way or another. But thankfully, I am now feeling much better and normal service is resumed.
Tuesday, 1 October 2013

So they now live in a cooler somewhere in the kitchen and I try not to look too hard for them. I am going to have to sort them out soon enough, but for now, out of sight, out of mind.
But.

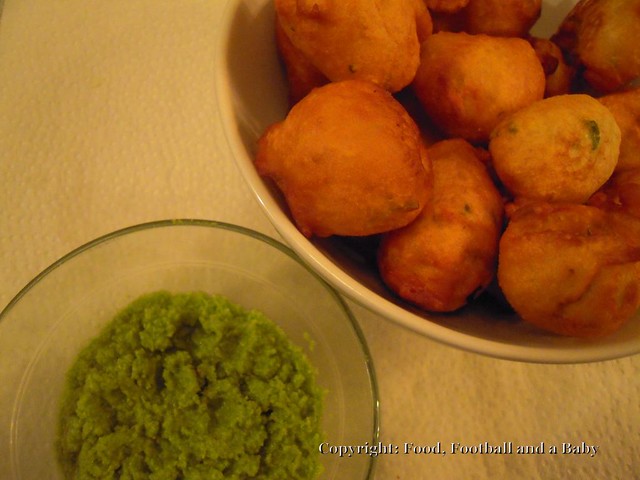
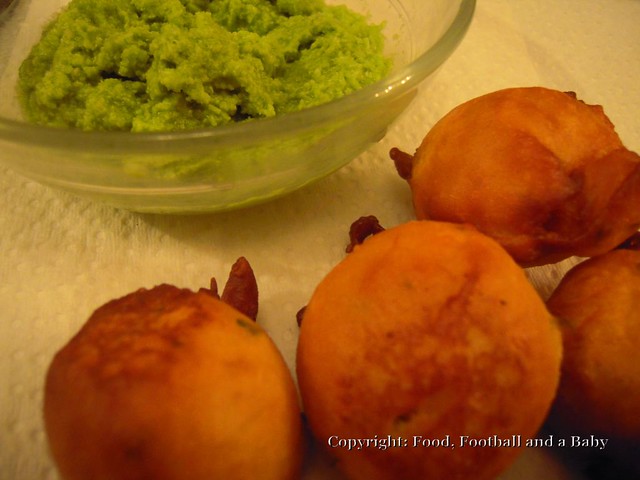
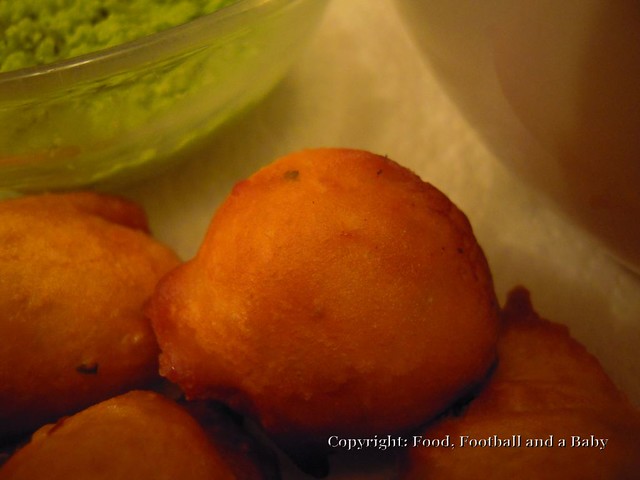
The one thing that I did do with my early ones was grate them all and pop them into the freezer. I was thinking about these Lemon Zucchini Cookies when I was doing that. But then I realised that they would work perfectly for these bhajis too. So now my zucchinis are doing a happy dance, because not only do they get made into cookies, but there's nothing better than hot, crispy zucchini onion bhajis with a steaming cup of chai on a cloudy, grey autumn morning.
I can live with that. Take that, Mr. Over-proliferating Zucchini.
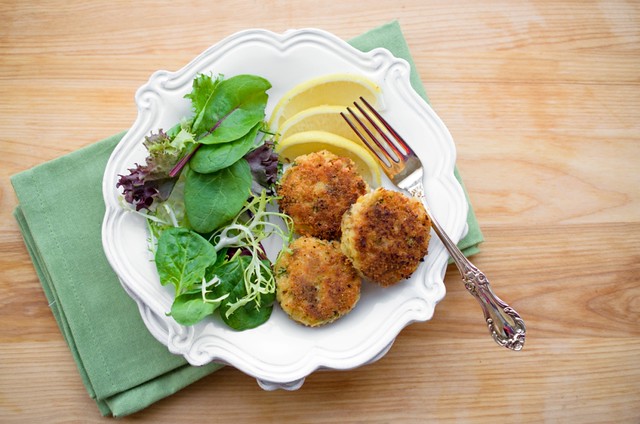
These bhajis are an adaptation of my onion bhajis. The sliced onion adds a nice hint of sweetness to these delicately spiced morsels. I served them with a lemon cilantro mint chutney that cuts through the richness of these bhajis.
(Printable Recipe)
For the Zucchini and Onion Bhajis
2 medium zucchini, coarsely grated (around 750g total weight)
2 tablespoons kosher or coarse sea salt
1 medium onion, thinly sliced
1 1/2 cups chickpea flour (gram flour)
1/2 teaspoon baking soda
1 teaspoon whole cumin seeds
1 teaspoon ground cumin
1 teaspoon ground coriander
1 teaspoon mild chilli powder (or 1/2 teaspoon hot cayenne pepper)
More salt to taste
1/4 cup water, if required
Unscented oil to deep fry (I used canola)
Lemon Cilantro - Mint Chutney
Large handful fresh cilantro
Large handful fresh mint
Juice of one large lemon + extra to taste
1/4 cup water (as required to blend)
Salt to taste
Method:
Place the grated zucchini in a large bowl and sprinkle over the kosher salt. Stir well and leave for about an hour. Drain and rinse the zucchini well, squeeze out the excess water, then place in a bowl.
Add the onion, chickpea flour, baking soda, whole and ground cumin, coriander, chili powder and salt to taste.
Using your hands (beware, this is messy) or a spatula, mix everything together very well, until it comes together as a very thick batter. Add a splash of water too loosen the batter, if it feels too stiff.
Heat the oil in a deep pot to 350 F. Using a tablespoon measure, gently drop in small balls of the zucchini-onion bhaji batter into the hot oil. Fry, turning every so often for 4 - 5 minutes, or until the bhajis are golden brown and cooked through.
Lift the bhajis out, using a slotted spoon, and drain well on kitchen paper. Serve hot with the lemon-cilantro-mint chutney.
To make the chutney, blitz together all the ingredients until smooth, using just enough water to blend. Taste and season with more lemon juice and salt, if required. This chutney is quite fresh and tangy, so load up on the lemon juice, if you like it.
Friday, 4 January 2013
Happy new year, everyone... 2013, wow, another year, another beginning! I am feeling a bit weird this year, because, to be honest, I have no idea where the last year went. It feels like only yesterday life was all organised and stable and suddenly, its upside down again.
2012 has been a year of ups and downs in many ways. It was the year Aditi started kindergarten, or big girl school, as we call it. I made good friends in Edmonton that I feel confident that I can turn to when life gets tough, and got my life into shape. I was lucky enough to be invited to events here, and also contributed to several e-zines and recipe books. I became more confident in my cooking, and Food, Football and a Baby, a small personal blog, turned into The Tiffin Box, which is so much more reflective of my life now.
The downside was all those awful world events that took a toll on all our lives. Kay and I were really affected by the Newtown tragedy, especially as our baby girl is the same age as those beautiful kids who were senselessly killed. We cried with all the parents, and we couldn't even watch some of the coverage for fear of breaking down. I rarely talk politics on this blog, preferring to keep it simple, but this tragedy made me question a lot of things in life, and get more involved in making a difference.
Saturday, 14 July 2012

Its been a weird week. I've had news that's made me hugely happy, and
then we've had events that have made both Kay and I sad. Lets start
with the good news. See that shiny new badge on my right sidebar?
→
Yes,
I've been voted into Babble's Top 100 Mom Food Blogs for 2012, and I am
number 24. I am so chuffed and I want to thank you all so much for
putting up with my constant begging, begging, whining,
guilting requests for votes from you all. Its been an
incredible journey, and I am finally beginning to feel settled and happy
with myself and this little space I've created.
So thank you all from the bottom of my cooking pots and pans! I couldn't have done it with your constant support and encouragement.
Tuesday, 10 July 2012
All this drama... while the answer was blindingly obvious, of course. Eat the damn things and sod the pictures :) Oh, and when you're at it, drink all the limoncello as well, you'll need it!

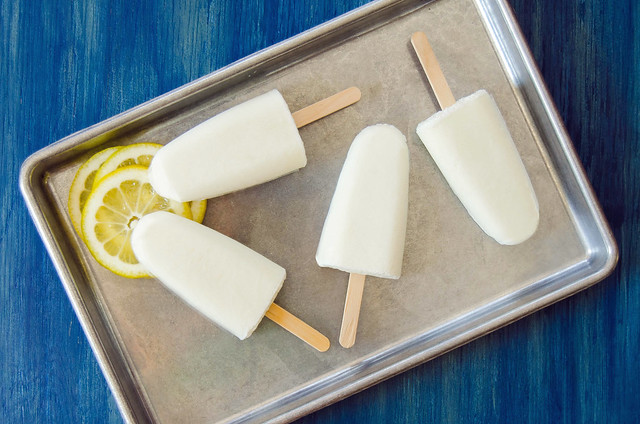
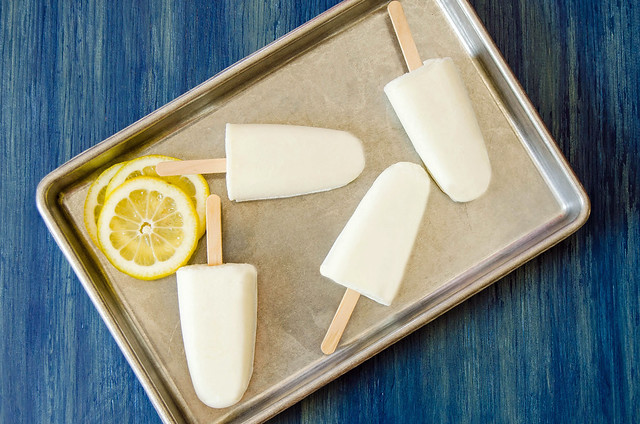
That said, can you think of a more perfect way to beat the heat? Fresh, tangy citrus teamed up with a delicate liqueur, all in a delicious creamy popsicle?
Thought not.
The idea for these creamsicles came from David Lebovitz's book. I've been addicted to his lemon ice cream for years now, but I also wanted to change things up a bit, as some aspects of it weren't quite working for me. The ice cream kept turning slightly powdery (delicious, nonetheless) and obviously some ingredients just weren't the same here. So I worked and reworked it several times, before coming up with this version, which, to be honest, is pretty close to perfect. The alcohol keeps the creamsicles smooth and creamy, while dissolving the sugar and lemon juice prior to blending in the half and half got rid of the powderiness. And of course, you can always freeze this in an ice cream machine, like I did, and serve with a sprinkling of lemon zest and a splash of limoncello.
And how did I stop them melting enough to take some pictures? Well, I cut out some paper towels in the shape of these popsicles, and placed the creamsicles gently over top of them. Solved part of the melting problem, but these pics were still taken in under five minutes :) Sometimes, photography has to take a backseat to more practical considerations like, how do you keep these treats away from sneaky li'l hands? That, I haven't yet figured out!!
(Printable Recipe)
½ cup fresh squeezed lemon juice
½ cup caster sugar (berry sugar) *increase to ¾ cup if you like your creamsicles sweeter
2 cups half and half (10% cream or 1 cup single cream + 1 cup whole milk)
Pinch of salt
1½ - 2 tablespoons limoncello
Method:
Place the lemon juice and sugar in a bowl, and whisk together until the sugar is reasonably well dissolved.
Whisk in the half and half and salt. Transfer to a blender and blend for 1 minute, until the mixture is lovely, thick and creamy.
Stir in the limoncello.
Pour immediately* into popsicle moulds and freeze overnight until set completely. Run water over popsicle moulds to release.
* If you leave the mixture in the fridge before pouring it into moulds, it could separate. Give it a good whisk to combine before pouring into moulds or freezing in an ice cream machine.
Friday, 29 June 2012
I am sure all of you have done this on many ocasions. When I am frustrated, mad, angry or just plain pissed... I cook and clean. I vent all of my woes on that poor ingredient that needs to be at the sharp end of a knife. My poor chopping board has been the recipient of many a bash and bang, and my onions and tomatoes cringe when I come at them in that mood. Copious amounts of butter/ oil/ cream get poured into the food, and nothing gets spared in the house. Floors get vigorously cleaned, bathrooms shine, furniture glistens, surfaces sparkle, carpets get beaten... damn, I should get angry more often, right?
Now that you know what I do... you might as well as know why. Its bleeding Air Canada. What other airline in the world can be so contemptuous of its customers? Not content with driving other, smaller airlines out of business, they now hold such a monopoly, that they can pretty much quote you fares out of their ass. Kay and I always got incredibly frustrated with them... for example, their local flights from one small town to another would usually end up costing us more that out entire return flight from, say, Manchester to Vancouver. Such a massive pain in the posterior that!
So basically, this means another long seventeen hour drive to the in-laws then. Argh! And don't even get me started on mobile phone prices...
Monday, 18 June 2012

Me (after listening to Aditi yammering away for what felt like the whole day!): Aditi, don't you ever stop talking?
Aditi (looking at me quite seriously): Mommy, I am just making sure my tongue works.
Or, this one.
Me: Aditi why don't you like spice?
Aditi: Mum, I like spice when you put it in desserts.
Sigh!!!
Sigh!!!
Wednesday, 20 July 2011

As you've probably already noticed, the blog has lost a lot of its pictures... I am slowly working to get them back out on here, but its a big task. I never actually realised how many pictures and recipes I had on this blog until I had to go through them to upload on Flickr and then repost. I took the opportunity to rewrite some recipes, and revisit the posts, so I could make them better. So I guess, in a way, there was a silver lining to this blogger induced black cloud. The pictures are not all up yet, but will be by the end of this week, and we can get back to business as usual :-)
But that said, I will also be taking a short blogging break for two or three weeks. One of my best friends is visiting me from Germany, and we have decided to head out into the Rockies for a road trip! I cannot wait... in my opinion there is nowehere as gorgeous as the Rocky Mountains in the summer, and the Jasper-Banff Highway, also called the Icefields Parkway, is simply paradise on earth (well, if you exclude all thr tourists, that is :-)) So after this one, my next post is likely to be at the beginning of August, unless of course I get inspired at a campsite or two or three!
Saturday, 26 February 2011
Monsoons in coastal India, which run from June to September, are well know for their fierceness and relentless rain. As kids, we were all bundled up in raincoats and rain shoes, and sent to school looking like little rain slicked wet rats. Usually we were soaking wet by the time we arrived at school, and spent the rest of the morning trying to dry our skirts and overalls off. Usually the wettest of us lot were sat right under the school fan, so we would dry out faster. Of course this made us colder, and all we wanted to do was get out of there as soon as possible. If we were lucky, we would have a 'rain holiday', where we would trudge through gigantic puddles to get to school, only to be turned away at the gates... and then make our miserable way back, where we would drive anyone unfortunate enough to be home, absolutely crazy. Ah, happy days!
In Karnataka, and as a result, in Mangalore, we used to have an almost month long break in October for the festival of Dusshera. My mum, on the other hand, taught in Kerala, where they had a fortnight off for the feast of Onam, usually end of August. And while we were usually latchkey kids, it was a real delight after a cold, wet, rainy miserable day, to come home from school, and have mum there, usually making us a hot snack or two to have with a cup of milky coffee or tea.
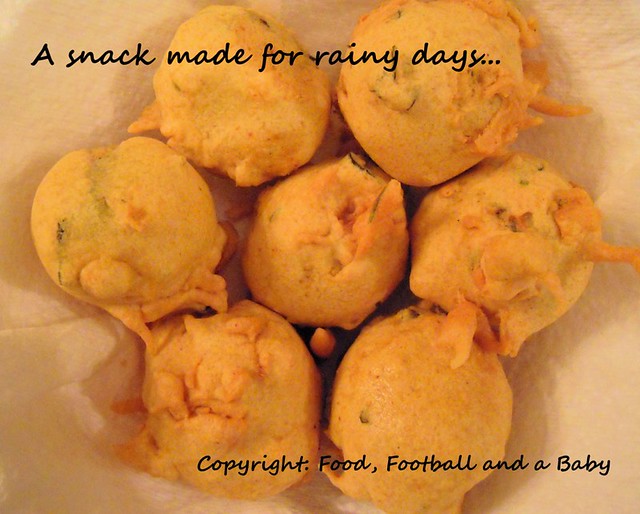
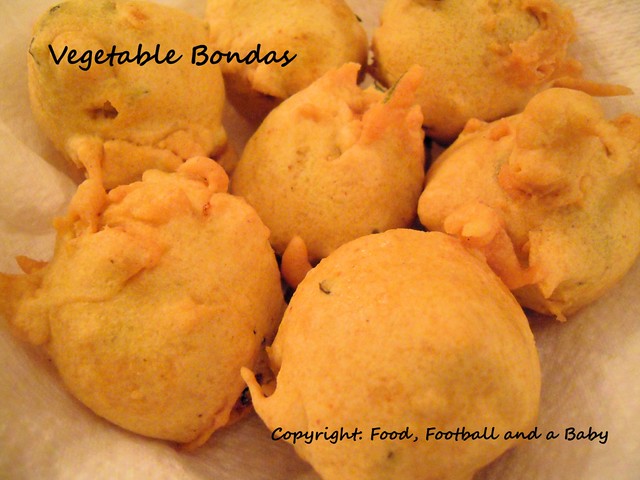
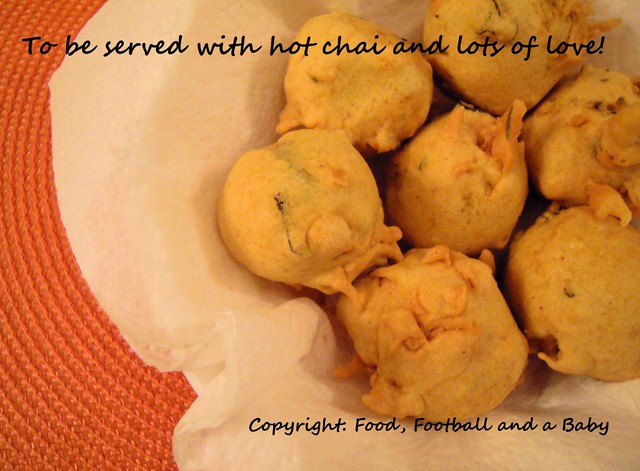
Sometimes, if we were lucky we got these bondas with our tea. Bondas are a snack that are available through most of South India, and we see them piled up at the street vendors, and in little restaurants. They are mainly served with chutney or ketchup, and basically comprise of a mixed vegetable and potato filling, coated with a spicy chickpea batter and deep fried. I cannot describe the way they tasted, crispy but soft on the inside, with a real spice kick from the chillies.
I was cold and miserable here in Edmonton last week, and I decided, to heck with the diet, I was going to make bondas to eat with tea. So I adapted a recipe from the Mangalore Ladies' Club Cookbook, and made these. They tasted so good with a cup of hot chai, and all memories of home just came flooding out [I think I am already annoying Aditi with all the stories about India, like the good half-expat that I am :-)]
Recipe:
(Printable Recipe)
For the vegetable filling:
1 large or 2 medium potatoes, peeled, and chopped
2 carrots, peeled and chopped
Generous handful of green peas, fresh or frozen
1 small beetroot, grated (optional)
1 green chilly, finely minced
1 clove garlic, microplaned
1/2 inch piece of ginger, microplaned
1 sprig curry leaves
1 tsp mustard seeds
1/4 - 1/2 tsp hot chilli powder or to taste
1/2 tsp garam masala
1 tbsp oil
Handful fresh coriander, chopped fine
Salt to taste (I used around 1 tsp)
For the spicy batter:
2 cups chickpea/ gram flour
1/2 - 1 tsp hot chilli powder or to taste
1/2 tsp garam masala
1/4 tsp amchoor (dried mango powder) (optional)
Salt to taste (I used 1½ tsp)
Enough water to make a thick batter
Oil for deep frying
Method:
Boil the potatoes, carrots, peas and beetroot (if using), until the vegetables are very soft. Drain and mash coarsely.
In a small pan, heat the oil and add the mustard seeds. When the splutter, add the curry leaves, ginger, garlic, green chilly, chilli powder and garam masala. Sauté quickly for around 20 seconds, then pour into the mashed vegetables.
Stir in the chopped coriander, and mix everything well. Add the salt, check seasoning, and add more salt if you think the mash needs it.
Shape the filling into small balls, and pop into the fridge to firm up a bit, if possible.
Meanwhile, make the batter. Stir together the chickpea/ gramflour, chilli powder, garam masala and salt. Add water little by little, until a thick batter is formed. The batter should be a little thicker than double cream. Adjust with more flour if the batter is too runny. Keep aside for a few minutes.
Heat oil for deep frying. The oil is at the right temperature when a drop of the chickpea batter rises quickly to the top covered in bubbles.
Take out the shaped vegetable balls. Dip into the batter, so the balls are covered with the batter. Carefully drop the balls into the hot oil. Again, like with other snacks, don't worry if the shapes are odd, it all adds to the taste :-) Fry the bondas till they are a light golden colour. Carefully lift out of the oil, and drain on kitchen paper.
Serve hot with ketchup, coconut or mint chutney, and a cup of hot tea is de rigueur, of course!
Note: If there is left over batter, just swirl it into the hot oil and fry till crisp. It tastes really good on its own too.
Friday, 25 February 2011
This blog post has been sitting in my folder for a couple weeks now. Sometimes I can be such a lazy arse :-) It took Shireen's chocolate cake at Ruchik Randhap to finally make me get to blog it. Shireen's blog is amazing, by the way, go have a look at it. Some of her traditional Mangalorean food really makes me homesick.
I love the Italian Centre Shop here in Edmonton. It particularly stands out, as there is no real grocer or the likes of Marks and Spencer here. I think that it is a real shame because Edmonton could do with the likes of such supermarkets. The only place you can get nice fresh veg and fruits is the farmer's market, and while I love to visit and ocasionally splurge, I have found that my budget will really not allow for regular shopping there, as its really expensive. And, in general, grocery shopping is brutally expensive in Canada. I find myself easily spending more than $80 on a basic, regular grocery run, which is well on the higher end of the scale.
So, the Italian Centre has become my go-to place for stuff like cheese and salami (its also nice to have them in small packs as I am the only omnivore in the house) and European food like smoked mackerel, cheap Bonne Maman conserves and general pantry items that I like to stock at home. Its cheaper than Safeway, Save-on-Foods or Sobey's and gives me the opportunity to get things like Marmite at a better price.
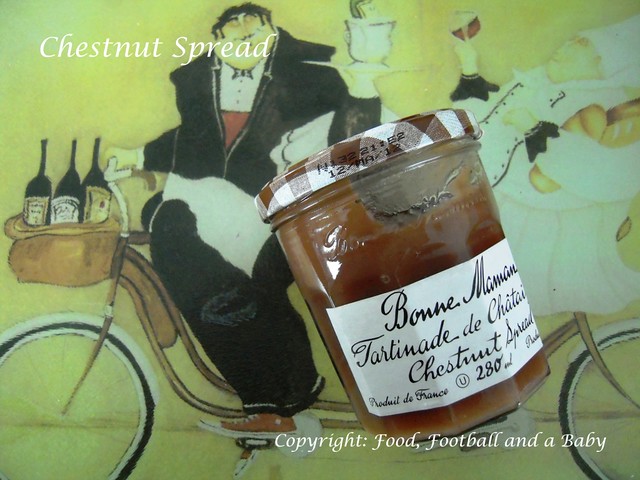
I also like to pick up things there that I haven't seen or tried before. Which is where I found this Bonne Maman jar of chestnut spread.
I was intrigued enough to buy it, but was then stumped as I had no idea what I was supposed to do with it. A quick Google brought up a few recipes for chestnut cake, but none really used this particular spread.
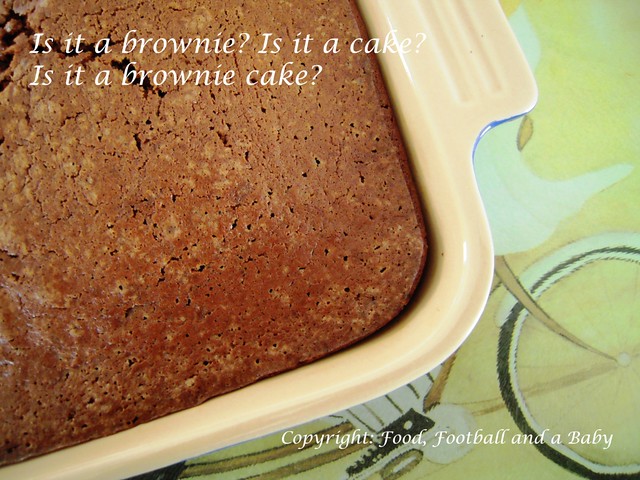
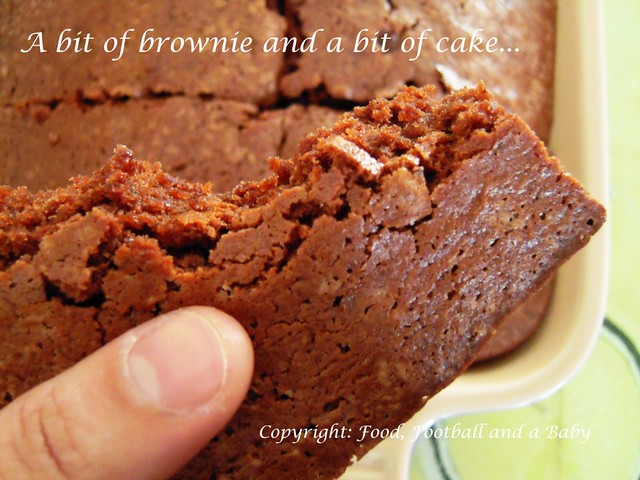
So the jar stayed in the pantry until a few weeks ago. I was rooting about to see if I could find a snack, and found this instead. I gave up on Google and turned to my trusted Mary Berry instead. Probably for the first time, I was feeling adventurous enough to try and modify a recipe. I picked her recipe for chocolate brownies, and adapted it to include the spread. This meant that I had to change quantities, and experiment haphazardly with quantities, but I was quite pleased with the end result.
I wouldn't call these brownies, as they weren't dense enough, but more on the cakey side, so this concoction is officially christened brownie cake. The taste of cocoa was quite strong, but surprisingly you could taste the chestnut spread in it too. The chestnut also made the cake beautifully moist, and it was practically melt-in-the-mouth. It disappeared quickly enough, so there were certainly no worries about how it tasted :-)
An apology though. The cup and weight measures are mixed up here, so you'll need to weigh out the butter. I converted the rest of the measures into cups.
Recipe:
(Printable Recipe)
75g butter (1/2 cup)
1 cup sugar (250 ml)
1 jar Bonne Maman chestnut spread (280 ml)
4 eggs
3/4 cup flour (roughly 200 ml)
1/2 tsp baking powder
1/4 tsp salt
3 tbsp cocoa
Method:
Preheat the oven to 350 F (175 C)
Sift the flour, salt, cocoa and baking powder together in a bowl.
In a separate bowl, cream together the butter and the sugar.
Add the eggs and chestnut spread and whisk together until well combined.
Now add the flour mixture to the butter mixture, bit by bit, until all the flour has been added. Scrape into a baking tray, and smooth out the top.
Bake for roughly 40 - 45 minutes until a skewer comes out clean and the edges are pulling away from the pan. Take out and leave to cool, then cut into squares.
Serve warm or cold, with cream or ice-cream.
Thursday, 18 November 2010
With temperatures hitting -20 here in Edmonton, I figure its absolutely fine if I gorge on comfort foods. After all I have to keep up my core body temperature... at least, that's my excuse :-)
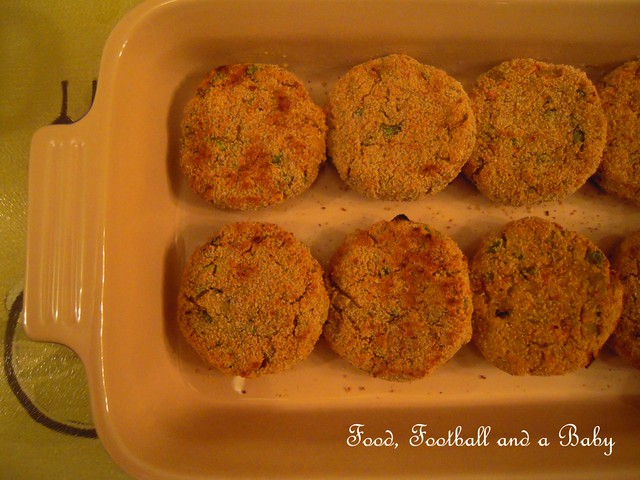
Vegetable cutlets are another of my comfort foods. They are an ubiquitous snack in India, especially on trains. Having spent loads of time on trains travelling to and from home and university, I am especially nostalgic about train food. They are usually served simply with a bit of chutney and ketchup, and are filling, fairly nutritious and delicious, with their crisp fried outsides and yummy moist, spicy, vegetabley insides!
I made these cutlets to serve as a snack with afternoon tea, and they went down extremely well with the family. You can pretty much use any mashable vegetables in these cutlets along with the potatoes. I used carrots, peas, cooked chickpeas and sweet potatoes . Skip the green chillies for a less spicy version. They also work really well as an alternative to meat burgers.
The cutlets freeze very well, fried or not. If you want to freeze them uncooked, just layer them between squares of greaseproof paper, defrost thoroughly before frying. If you're freezing fried cutlets, defrost before using, and use a oven to reheat them to regain their crisp outside.
Recipe:
(Printable Recipe)
1 small onion, chopped fine
1 large or 2 small carrots, diced
1 large potato, diced
1 medium sweet potato, diced
1/2 cup fresh or frozen green peas
1/2 cup tinned, or cooked, chickpeas
2 flakes garlic, microplaned or grated into a paste
1 inch piece of ginger, microplaned or grated into a paste
1 or 2 green chillies, chopped fine
2 tsp ground coriander
1 tsp tbsp ground cumin
1 tsp garam masala
1/4 tsp chilli powder (increase for added spiciness)
1/2 tsp amchur (dried mango powder) (optional)
2 - 3 tbsp finely chopped fresh coriander
A few tbsps besan or gramflour (or cornflour)
Salt and pepper to taste
1 cup dried breadcrumbs or a coarse semolina (sooji), for coating
Oil, enough for shallow frying
Method:
Boil the carrots, potatoes, sweet potatoes and peas, until cooked and tender.
In a small frying pan, fry the onion for around 2 -3 minutes. Add the ginger and garlic, fry for a minute, then add the green chilly(ies). Fry for around 30 seconds, then add the ground coriander, cumin, chilli powder, amchur and garam masala. Fry together for another 2 or 3 minutes, adding a dash of water if the mixture is too dry.
In a large bowl, mash the boiled vegetables, along with the chickpeas. Tip in the fried onion/ spice mixture and mash again. Add the fresh coriander and mix in well. If this mixture is too wet, stir in a couple tbsps of besan or cornflour, until it binds together well. Season with the salt and pepper to your taste.
Shape the mixture into balls, then flatten until you have round cutlets. You can also shape them into other shapes like hearts, triangles, squares etc, according to your preference.
Gently dredge the shaped cutlets in the breadcrumbs or semolina, coating well. Put the prepared cutlets into the fridge for about 30 minutes or so. This will help them set, and not break up in the pan while cooking.
In a frying pan, add just enough oil for shallow frying. Fry the cutlets, two or three at a time, until both sides are golden brown.
Serve with coconut or mint chutney and ketchup and a hot cup of tea or coffee. Yummy!!
Friday, 12 November 2010
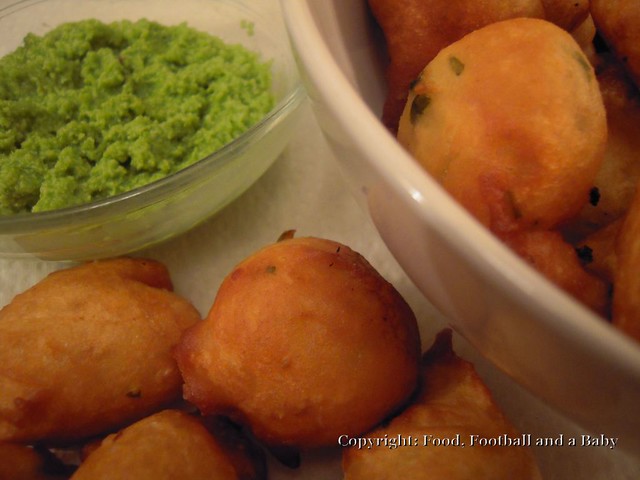
Yum yum yum!! Another snack I adore from Mangalore. I can eat goli baje by the bucketful if given the opportunity. Goli baje are basically deep fried seasoned balls of flour and yoghurt, lightly spiced with some green chilli, ginger, fresh coriander and even curry leaves. The literal translation of the words means, 'round fried snack'. Its famous all around Mangalore, and many a time I have sat in a hotel in the middle of nowhere, sipping strong hot coffee and savouring these mini bites of delight with sambar and coconut chutney, sometimes even with good old ketchup.
It is another one of those snacks that is deeply associated with my memories of Mangalore, and home. There were days when my mum would come home from her teaching job absolutely exhausted, and she couldn't be bothered to make us anything for tea. My sister and I used to be sent to Gokul Vegetarian Hotel to buy snacks, and ten to one, we would end up bringing back home goli baje which we would then share with mum and a hot cup of tea. Or when we got older, we would spend hours with friends at roadside eateries just eating snacks after snacks after snacks. Its a miracle I haven't ended up weighing ten tonnes, the way we ingested all that cholestrol heavy food :-)
This is one of those snacks we never really bothered to make at home. I mean, why would we go to the trouble of making up the batter and spending at least an hour over a hot stove when we could just pop around to the local eatery?
However, when I moved to England, and subsequently, here to Edmonton, there are times when I crave the comforting food of my childhood and most of my adolescence. Sadly for me, I haven't found a single place in Edmonton that sells goli baje (I am sure I would keel over with a heart attack if I did, I'd be eating there so often). I have found a nice South Indian place though, more on that in a later post. So coming back to my point, if I want goli baje I have to make them myself. Bah humbug, all that work!!
So anyway, armed with a list of ingredients off my mum (I swear to God, she is so imprecise in her measurements, a bit of this and a bit of that, and yet her food somehow tastes glorious!!) I decided this afternoon was going to be my goli baje time. It gets dark early nowadays, and its so cold outside, it would be just criminal not to gorge full of comfort food! Or at least, that's my excuse.
The ingredients are fairly basic, more often that not you will have them in your pantry at any given point. You do need to get a feel for the thickness of the batter though, but that comes very quickly with some practice. And hey, you can always add more water or flour without messing with the taste.
I tinkered a bit with mum's recipe, to make sure I had some basic ideas of quantities, as normally with a recipe like this I would have eyeballed it. So here's the modified recipe. Do play around with the quantity of green chilli and ginger until you get a sense of what suits your spice tolerance level. My mum suggests letting the batter ferment for at least 6 hours, I say ha!! to that, but good on you if you have the patience to do that, 30 minutes is my limit :-)
I served the goli baje with coconut chutney, recipe here.
Recipe:
(Printable Recipe)
1 cup plain flour (maida)
1/4 cup besan (chickpea/gram flour)
1/2 cup plain yoghurt
1 tsp bicarb of soda (substitute baking powder, if you don't have the bicarb)
Around 1/4 cup water, plus maybe a little bit more.
2 tbsp sugar
1 or 2 tsp salt (go easy on the salt, add more only if you feel the batter needs it)
Around 2 tsp finely chopped ginger
1 green chilly, finely chopped (add more if you wish to increase the spice level)
Roughly 3 tbsp finely chopped fresh coriander
Enough oil for deep frying
Method:
Sift together the flour, besan, bicarb of soda, sugar and salt. Mix well, then add the yoghurt, mixing well. Now slowly whisk in the water, a little at a time until the batter just very heavily slides off a spoon, the consistency of very thick clotted cream...
Heat enough oil for deep frying in a pan, until it gets hot enough that if you drip in a drop of batter, its should quickly rise to the surface covered in bubbles. Turn the heat down to medium.
Drop in spoonfuls of the batter, not too much at a time, as the bajes will fluff up in the oil. Deep fry for roughly five to seven minutes, until they are a light golden brown colour. Don't worry if they are odd shapes and sizes, just adds to the fun!
Using a slotted spoon, lift them gently from the oil and drain on absorbent kitchen paper. Repeat until the batter is all used up.
Serve hot with chutney or ketchup and a hot coffee/tea. The bajes will be crisp on the outside and almost squishy elastic on the inside!
Bliss!!!
Saturday, 18 April 2009
Here's the recipe for the eggs. Its the quickest way to jazz up a boiled egg, and it goes well as a lunchbox treat, as well as with a nice biriyani. I know the pic looks a bit rude, didn't mean to do that, husband ate a piece of the paratha before I could get the pic and so I had to cover that bit with the eggs :-)
Masala Spiced Boiled Eggs (makes four to six)
4 - 6 hard boiled eggs
1 tsp vegetable oil
1 tsp mild Kashmiri chilly powder (or 1/2 tsp hot powder)
1/2 tsp ground turmeric
1/2 tsp ground pepper
1/2 tsp salt
1/4 tsp garam masala powder
1. Heat the oil in a shallow pan, and put in all the spices. Saute the spices for about 1 minute or so, making sure they don't burn.
2. Meanwhile gently cut into the eggs a little bit, all around the egg till the yolk, but don't cut into the yolk.
3. Then put the eggs into the mixture, and roll them around until well coated with the masala. Heat the eggs through and serve. Yum!!!
Subscribe to:
Posts
(
Atom
)
